Chisel Sharpening
How to sharpen chisels and plane irons
Chisel Sharpening and plane iron sharpening regularly is the easiest and best way to keep your tools in good working condition. The longer they are left the harder it is and the longer it takes to get a good sharp edge. Most people think sharpened chisels are dangerous but the opposite is true. Trying to force blunt chisels through timber increases the risk of slipping and either injuring yourself or damaging/ruining the work-piece.
 |
Chisel sharpening involves two different angles, one being ground the other honed. When first purchased they will likely only have the ground, bevelled edge of 25°. A honed angle of 30° will need to be applied onto the tip of that bevel to give it the sharpest possible edge.
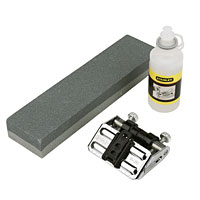
What tools do you need?
Chisel and plane sharpening with a oil/diamond whetstone
To sharpen a chisel or plane iron with a normal stone and a honing guide follow these simple steps. The same steps are applied whether you are using a coarse, medium or fine abrasive, coarse is only really needed if you are grinding the blade after having hit a nail or hard know etc that has dented the tools cutting edge;
Step 1: Fix down the Oil or wet stone base
Most stones come stored in a box that when the stone is removed from can be screwed down to a work-piece or scrap timber. Do this first to keep the stone from moving and sliding around whilst sharpening the blades.Step 2: Oil or wet the stone
Using water or oil lubricate the stone ready for grinding. Wipe off any excess and keep more oil/water handy for later, as well as a rag that can be used to clean off the stone. At any point during sharpening if the stone becomes dry or particularly dirty clean it off straight away and re-lubricate.Step 3: Place chisel in honing guide, set the angle
Slide the chisel or plane iron into the honing guide and tighten it so it if held but loose enough to be adjusted. My honing guide has measurements written on it that blades should protrude in order to achieve the desired angle. Using that or the instructions for your honing gauge if they are different set the blade at the desired angle, 25° for grinding or 30° for honing.Step 4: Begin Chisel sharpening
Slide the tool and guide over the stone backwards and forwards keeping the chisel edge firmly in contact with the stone. As much as is possible with straight wheels try to use the whole stone working slowly from left to right whilst going backwards and forwards.Step 5: Clean off the burr
After a short while a burr will appear on the underside of the blade. Turn it over so it is flat and again slide it from side to side over the stone.Step 6: Repeat process and clean up
Repeat the process above until the desired cutting edge is achieved. When happy remove, clean and dry everything off. Finally place all the chisels in your Faithfull Chisel Roll to keep them safe and sharp.
Trend Fast Track Sharpening System
Chisel sharpening with an oil stone is a fairly slow and painstaking process. I don't get paid to sharpen my tools so when they're dull, I need to sharpen them as quickly and easily as possible and get back to work. That's why I bought a Trend chisel sharpener.
A New chisel sharpener that makes a mundane task quick and easy!
To be completely honest, sharpening all my chisels has never been a particularly fun job. Working to tight deadlines on site also leaves very limited amounts of time to spend at the stone trying to get a decent sharp edge. It's not just the actual sharpening, the set up time in between making sure the honing guide is true takes a couple of minutes for each chisel, and angle too.
I first came across the Trend chisel sharpener when another carpenter had one on site. I borrowed it to sharpen all my chisels in less than 20 minutes, including sorting out an old one I use for rough work like scraping and cutting plaster/plasterboard etc. I actually went straight home and ordered one online
How does it work?
It's completely different to a honing guide and sharpening stone in that the interchangeable diamond cutting blades are held in place by magnets in the carriage body. The carriage slides across the blade on nylon rails (keep these clean and well lubricated) in order to grind a good sharp cutting angle. Turn the carriage body round to switch between 25 and 30° angles for the bevel/microbevel. It's faster to both use and setup, cleaner and I believe more accurate than a honing guide - there's virtually no way you can get it wrong.
Whilst for serious woodworkers by chisel sharpening the slow way will get a much sharper edge, this jig is the fastest and most practical way to get a really good edge quickly and with very little margin for error. I have minimal amounts of time when I'm working to spend sharpening my tools and need the quickest possible way, not the most time consuming. It's not cheap but if you're pressed for time, want speed and work on a price like I often do this sharpening jig is arguably the quickest method you'll find. There are two grades of diamond sharpening stone so you can start coarse then hone to a much finer edge if there's time too. I've still got my old honing guide and stone from the days when I used to sharpen chisels the old fashion way with oil but I haven't used them since I bought the Trend chisel sharpener.
Back to the hand tools page?
Have a question or comment about chisel sharpening?