3 ways you can make a pipe boxing for hiding heating & plumbing pipework
DIY How to box in pipes in vertical & horizontal pipes in Kitchens & Bathrooms
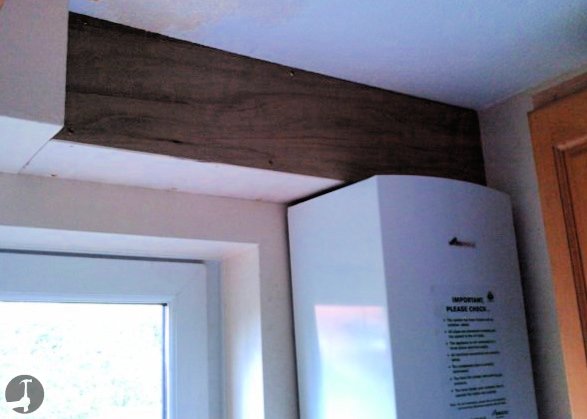
Building a neat pipe boxing is a great way to hide unsightly pipes that plumbers have had to retro fit onto the walls. These are most often vertical, coming straight out of the ceiling or flor but can also run horizontally as well.
If you do a neat job, your pipe boxing can fit in really well and not look out of place even if it is in a kitchen or bathroom where it is likely to be seen.
A pipe box can be finished with paint, wallpaper, cladding or even tiled so that it fits in and isn't an eye sore.
When you make a pipe boxing in a Bathroom, Kitchen or other potentially humid area a tight fit is essential as well as sealing sufficiently in order to prevent damp getting in and causing mould to grow behind/inside the box.
Generally avoid using MDF to box pipes in Bathrooms/Kitchens/Laundry room etc. unless you use moisture resistant MDF. If you cant use marine grade ply wood for the boxing, then I would at least paint it with exterior grade paints just to be safe.
 |
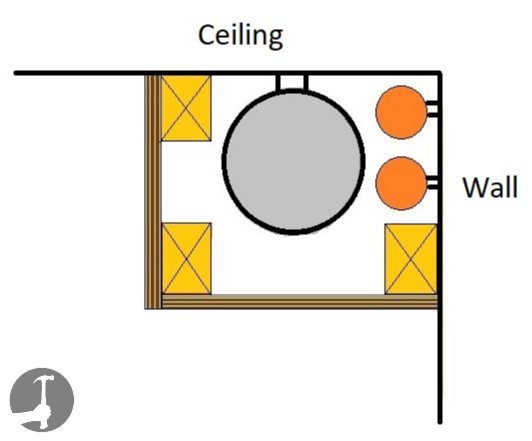 |
When I'm boxing in pipes that need to be accessible (sometimes the plumber has installed an isolator valve or shut off tap) I use white plastic screw cups like these to screw the Boxing together so that it is removable and the pipes can easily be accessed later.
You don't have to make the whole side removable but can use these fixings to create a tidy access panel.(Once it is painted simply use decorators caulk or silicone to seal round the outside for a neat finish. It just means you will need to run a knife around the edge when you want to remove it later).
Below is one example of boxing in horizontal boiler pipes that I made in a utility room/laundry. Once it has been decorated, nobody would look twice at this compared to exposed pipework because it will completely blend in with the wall instead of drawing your eye to it.
Which tools & materials do you need to make a pipe boxing?
The tools required for pipe boxings will vary depending on the type of sheet material you need to cut and the wall the battens are being fixed to (masonry/plasterboard for eg.).
For setting out;
- Carpenters pencil
- Tape Measure
- Combination Square
- Spirit Levels
Tools for cutting sheet material will be a Circular, Plunge or Hand Saw for Plywood/MDF. Stanley Knife, old Hand Saw and a Rasp or Surform for cutting plasterboard.
For fixing the battens;
- Battery Drill (with hammer action for masonry)
- Red Rawl plugs and screws, or cavity wall fixings if fixing to Plasterboard.
Step by step instructions for Casing In Pipes
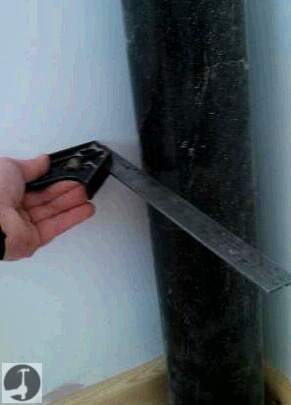
Using a Combination Square like in the picture to the right, find out how far from the wall the pipes protrude. Place the square against one wall and measure from the other wall to the square/ruler. I use the square because otherwise it's easy to get the measurement wrong. Because the pipe is round, your head might be in the wrong place when you sight the tape measure through. Take the measurement at the widest point of the pipe too, usually the knuckle where the pipe joins the bend if there is one. I will take measurements at the top, middle and bottom in case the pipe is out of level (horizontal waste pipes will always have a fall). Repeat for both sides to get the minimum widths for the battens to be fixed. |
 |
- Step 2: Cut 3 Battens to make up the pipe boxing framework
Measure from the floor to the ceiling and then cut 3 battens to length (if the walls already have skirting boards then the two battens for the wall may need to be shorter, or notched around the skirting with the third batten long enough to go the whole way).
- Step 3: Fix the battens to the walls, plumb/level or parallel - whichever would look best
When I fix the battens vertically to the wall at the distances calculated in step 1, 9 times out of 10 when making these pipe casings I parallel them from the corner of the wall rather than using a spirit level to scribe them in plumb (perfectly level upright) This is because when the wall is out of plumb and the boxing is perfectly plumb, it will be a tapered shape and stand out to the eye - highlighting the fact the wall is slightly out of plumb.
This is a judgment call though and will depend on what else is close by. If the Pipe Boxing is in a Kitchen and is close to cupboards that are perfectly level, the boxing would look odd if it was out of plumb. It would also make it more difficult to tile.
So make a judgement based on what will look right to the eye, it may mean choosing the lesser of two evils, or even splitting the difference and going somewhere in between. You'll need wall plugs and screws if fixing to masonry walls.
- Step 4: Cut the Ply-Wood, MDF, plasterboard or cladding material to size to make up the sides of the pipe box
You will need to cut one rip of Ply the same width as the distance from the corner of the wall to the outside edge of one batten. Glue and pin it with a Nail-Gun to the batten and screw the third batten to the inside of it. The second rip is the width the other batten was fixed at plus the thickness of the Ply/other sheet material being used as it will need to overlap. Once cut, glue and pin in place.
If the wall isn't completely flat you will need to scribe it to the shape of the wall for a tight fit.
How to make a Skirting Board Pipe Boxing
 |
 |
Horizontal pipe boxing's can also be made with Skirting Boards so that they blend in a bit more.
Common areas for skirting pipe boxes are Bathrooms, and when concealing radiator pipes in bedrooms/hallways. They are relatively easy to make/install and look much tidier than fixing the pipes to the face of the skirting board, especially if the top is kept flush with the top edge of the skirting.
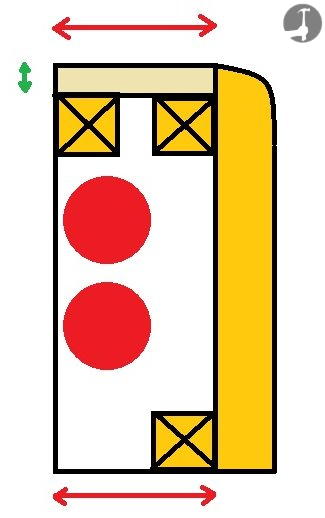
I usually use 9mm thick Ply Wood for the top of a skirting box. All you need to do is subtract the thickness of the ply from the overall height of the skirting. This measurement is the height on the wall up from the floor that the top edge of the batten needs to be fixed to.
Cut the Ply the width it needs to be to cover the pipes, not forgetting to allow for batten to fit inside too like the picture below. You can use a combination square like in step 1 above to work out how wide.
Fix a batten along the floor the same width away from the wall (shown with red arrows). Take care when screwing to the floor in areas where there may be pipes underneath, use screws that are too short to go any further than the thickness of the flooring and a pipe detector if unsure.
Lastly, fix a batten with plenty of PVA wood glue and pins/screws to the back of the skirting board. Not flush with the top but down the same thickness as the ply being used, before assembling it all together.
What's next?
Click here to go to the kitchen fitting page
Or here for lots more Skirting Board installation tips
Have a question or comment about how to Box in Pipework?