How to read a tape measure easily in metric and imperial measurements
Check out these top tape measure tips and tricks for accurate measuring and marking out
Sounds easy but knowing how to read a tape measure in both metric & imperial systems is really handy to know and imperial in particular can be quite tricky in the beginning.
On top of explaining that I'll share with you some handy tips and cool design features of your tape measure that you may not have know about when you bought it.

Different types of tape measure available and which one do I use depending on the job at hand
There are several different types of measuring tape available each designed for different things;
- Surveyors tape - Contained in a large drum, often 50m+ long for measuring and setting out large things like foundations
- Laser distance measure - often used again by surveyors, I use mine for quickly measuring walls etc. when estimating carpentry work
- Digital Tape Measure - A tape measure with a digital measurement display, used mainly for quickly taking rough measurements when quoting.
- 'Normal' tape measure - available from 3m to 25m, compact enough to keep on your tool belt and the type I use 90% of the time for carpentry work
Which tape measure is best for Carpentry work on site?
When choosing a tape measure to buy, look for these things;
- Robust/hard wearing enough to withstand use on site
- Stronger/reinforced at the hook end
- Strong locking - tape doesn't move when locked
- Clear markings make it easier to read a tape measure in the rain/dark etc. ideally with differentiation in font or colour between different types (mm to cm for eg.)
- Clear markings at different centres such as 400/800/1200mm or 16'/32'/48' as this will save time when marking and setting out
- I like mine to have both imperial and metric measurements and then I can use the type that's easiest to remember or most accurate in a given situation
I use this Stanley Fat Max Classic tape measure on site
A great all round tape measure for most people would probably be a 25ft long Lolbiu
Try to keep your tape measure as dry as possible on site. If it does get wet pull the whole thing out and use an old towel to dry it before you finish up for the day.
How to take accurate measurements with Imperial and Metric measuring systems when setting out
Only use the tape measure if you need to
Wherever practical and possible, I prefer to mark timber 'in-situ'. For example, if marking where I need a mitre on the leg of an architrave around a door frame, I prefer to hold it up and mark the line exactly where it should be cut. This helps avoid some margin for error when transferring measurements.
Should the end of the tape measure move & slide back and forth!?
Yes! One thing that often catches people out when trying to read a tape measure is that the hook on the end of the tape slides back and forth.
It does this so that the thickness of the hook is accounted for when taking inside and outside measurements.
When you measure in between two walls for example, you push the end of the tape in really tight against the wall. Then when hooked onto the end of a piece of timber to transfer that measurement, you pull the tape measure tight away from that hooked end.
Without this feature the measurement would always be out by a couple of millimetres or 1/16th of an inch depending on the system you read a tape measure with.
Keep the tape perfectly level or plumb when measuring
For accuracy when measuring between two points, ensure the tape is tight and doesn't sag in the middle. Get someone to hold one end if this is difficult or bang a nail in to give you something to hook the end of the tape over.
Also, make sure you hold the tape measure level or plumb. For example, if you were getting a measurement between two walls for a Dado Rail that will be fitted a metre up off the floor, mark a line up a metre off the floor at each end and hold the tape at that height.
If one end is high and the other low, you'll get a longer measurement than you want.
If in doubt, cut the work-piece a little long. You can always cut more off if need be, its difficult to put it back on! The more experienced you get the better you'll get at judging when to add/take off a bit from your measurements.
When measuring in between two walls, try this tip
The tape measure itself will often have a measurement on the side which indicates the length of the body itself. This is an amount you can add on to the measurement where the tape exits the body and therefore total up to get the correct overall size from the hook to the outer end of the body.
Even if that size is not apparent, you can still measure the body yourself and know the amount to add should the situation arise any time.
Or, if the distance is longer;

Make two marks for longer measurements
The method in the picture above helps if you need to read a tape measure over a particularly long distance, take in between two walls for example. First, measure from one wall out as far as is easily accurate. Make a mark at a point that is easy to add to another measurement - like 3m for example. Then measure from the other wall to that mark, and simply add 3m to the second measurement to get the total length
If in doubt, add a little on!
Always add a couple of mm or an 1/8th of an inch if you are unsure, you can always take it back to the saw and cut more off!
Difference between Imperial and Metric measurements
There are two different numerical measurement systems - Metric and Imperial.
America still use imperial, so did the UK until around 1995.
At school I was taught to use Metric but when I was on my apprenticeship I was taught by an old craftsman who still used Imperial measurements. The great thing about this is I can & do use both, depending on what is easier in any given situation. And I can adapt and work well with anyone no matter what system they happen to prefer as well.
I generally lean towards Imperial but it can get pretty complicated when you are calculating Spindle spacings for example where you need to divide measurements up.
Metric - Metric measurements are in Millimeters, Centimeters and Meters (then Kilometres).
There are 10 Millimeters in one Centimeter and 100cm (1000mm) in one Metre. When working in Metric you'll generally use Millimeters as that's most accurate. A sheet of ply in metric is 2400mm x 1200mm (or 2.4m x 1.2m)
Imperial - measurements are in Feet and Inches, and fractions of Inches.
One inch is broken up into 16 or even 32 increments, 1 Foot is made up of 12 inches. Imperial measurements are written in Feet and Inches and abbreviated, so 6'4 1/4" means six Feet four inches and a quarter of an Inch. A sheet of ply in imperial is 8'' x 4'' (96' x 48')
If you landed on Earth from another planet and knew neither, metric would probably be the easiest system to learn from scratch!
There are 25.4mm in 1". If your tape only splits Inches into sixteen segments (like in the picture below) then Metric is slightly more accurate because one inch can be broken down into 25.4mm. However, some tape measures break each inch down into 32 segments, which is then more accurate than Metric. Choosing the system you work with will probably depend on what your colleagues use and what you find easiest to understand.
How to read tape measure with imperial markings (in Feet, Inches & fractions of inches)

Above is what you'll find at the beginning of an Imperial Tape Measure. Each Inch is broken down into sixteen segments. Sixteenths of an inch are accurate enough for most carpenters.
In order to understand and read a tape measure with imperial markings, you will need to have a basic understanding of Fractions.
Although every segment is 1/16th of an Inch, you don't read the halfway point as 8/16ths, because you can 'simplify' that Fraction. If both numbers can be divided by another number then that's what you do in order to simplify. Both 8 and 16 can be divided by 8, so 8/16 is also 1/2 Inch (half inch).
Here is each increment of one Inch, simplified;
1/16th
2/16th = 1/8th
3/16th
4/16th = 2/8th = 1/4
5/16th
6/16th = 3/8th
7/16th
8/16th = 4/8th = 2/4 = 1/2
9/16th
10/16th = 5/8th
11/16th
12/16th = 6/8th = 3/4
13/16th
14/16th = 7/8th
15/16th
16/16 = 1 inch
It's confusing at first but becomes second nature after a short while.
How to add two imperial measurements or fractions together
It does get a little more complicated if you have to add two measurements together. This is fairly straight forward if the bottom numbers of the Fraction are the same,
1/4 + 1/4 = 2/4 = 1/2
And
2/4 + 3/4 = 5/4 = 1 and a 1/4
If the bottom numbers are different then it takes a little more work and you have to do the opposite of simplifying the fractions;
1/16th + 1/8th
Here, you need to make the numbers under the lines the same. Change 1/8 back to 2/16 so all of the sixteenths can be added together and then simplified again afterwards;
1/16th + 2/16 = 3/16th
Another example;
3/8th + 15/16th
Change 3/8 to 6/16 (multiply both numbers by two, so 3 becomes 6 and 8 becomes 16 = 6/16th)
6/16 + 15/16 = 21/16 Or 1 and 5/16
I hope that makes sense!
How to read a tape measure with metric markings, in millimetres, centimetres and metres
Completely different to an imperial tape measure, it is arguably easier to read a tape measure in metric than imperial;
Each small increment is 1mm and there are 10mm that make up one centimetre.
Each centimetre comprised of 10mm is clearly marked, all the way from 1 to 100, which becomes 1 metre.
So 1m = 100cm or 1000mm
When adding metric measurements together, if needed you can convert them easily to mm in order to do so and there are no complicated fractions to worry about;
1.2m + 4.7m = 5.9m
1256mm + 4983mm = 6239mm (also 623.9cm or 6.239m)
All that changes is the position of the decimal point!
What are the diamond markings for on a tape measure?
 |
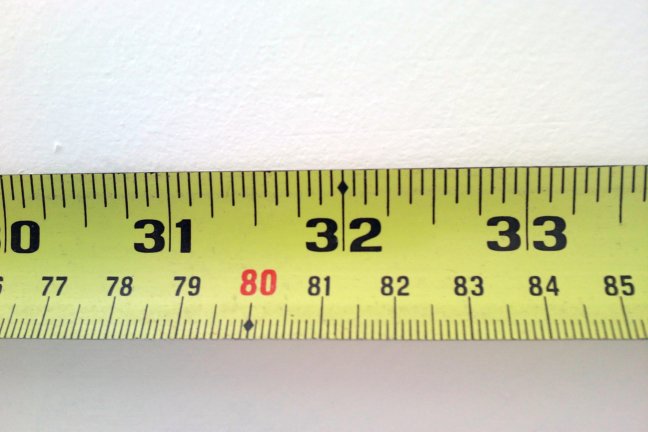 |
When you are building internal walls, setting out wall plates to take Roof rafters and when Joisting during Carpentry work you need to mark out the center position of each length of timber.
Tape measures are marked so you can quickly and easily see where the centers are without having to do too much math in your head! Metric centers are 400, 800, 1200mm and so on. Imperial centers are 16, 32, 48 inches and so on. If you look at the pictures above 400mm is red and also has a small black diamond making it stand out from the rest of the measurements. 16 inches isn't red on this particular tape but it does have a small black diamond, again making it stand out. All you need to do when setting out centers is look for these symbols, making it less likely you'll mark any timbers in the wrong positions.
Click here to go to back the main hand tools page
Or click here to check the latest prices on tape measures at Amazon

Use the comments box below to add your own tips about how to read a tape measure!