6 common reasons for a squeaky floor and even more ways to fix them for good
Use these quick and easy methods to stop your floor boards from creaking and squeaking
Whilst a squeaky floor creaking might help alert you to an intruder in the house generally it is pretty annoying to be woken up by others in the night and therefore something you might want to fix.
It is really common for floors to creak and squeak on the hallway upstairs, staircase itself or the landing which are all high traffic areas, so can therefore get really annoying.
If the floor structure is built during a UK winter, and all of the timbers and flooring are damp or saturated, this is a really good sign your floor could later develop creaks. As the timbers dry out when the heating is on after the build is finished, even though the timbers are seasoned and treated before delivery they shrink a lot and contract away from each other.
Tongue and groove chipboard floorboards should always be glued at the joints with lots of PVA wood glue but that won't be much help if everything is wet when installed.
Luckily there are several methods here you can use to fix most of the issues for good, hopefully without too many tools and for a relatively low cost.
What tools are needed to fix a squeaky floor - is it an expensive repair?
Depending on the reason your floor is creaking, the repair could cost anything from a few pounds to a couple of hundred.
- *Pipe/Cable detector!!* whatever you do, do not drill through a pipe or cable..!
- Hammer
- Possibly a nail bar for removing awkward nails or screws
- Battery drill/driver
- Pilot hole drill bit for narrow plank floors, like pine
- 50-70mm chipboard screws (for chipboard floors laid on joists)
- PVA glue, expanding foam & Gripfill could help
If it turns out to be a big job, you may also need;
- Circular saw
- Timber, such as 4x2 / 90x45mm
- Large nails/screws to fix the extra timber to the joists
If you want to have a go at fixing the squeaks with a squeaky floorboard repair kit;
- Pipe detector mentioned above
- Battery drill/driver
- Squeaky floorboard repair kit
(see my comments at the end of this page first before you go ahead and buy the kit)
Why is my floor squeaking, and should I worry about creaky floorboards?
Squeaky floorboards could be something you should worry about it all depends on the actual cause of the creaking itself.
If a pipe is causing the floor to creak, you may want to sort it out ASAP because after time the joint or pipe itself could become worn and burst, flooding your home!
The cause of your creaky floor could just be movement between your floorboards themselves and the joists below, or the nails or screws that were used to fix the flooring or joists in place during construction.
Whichever it is, the creak or squeak will be caused by the friction of two or more things moving and rubbing against each other.
If your entire floor is creaking you may have a fairly big job on your hands. If it is just a spot here or there you could be looking at a quick and inexpensive repair job.
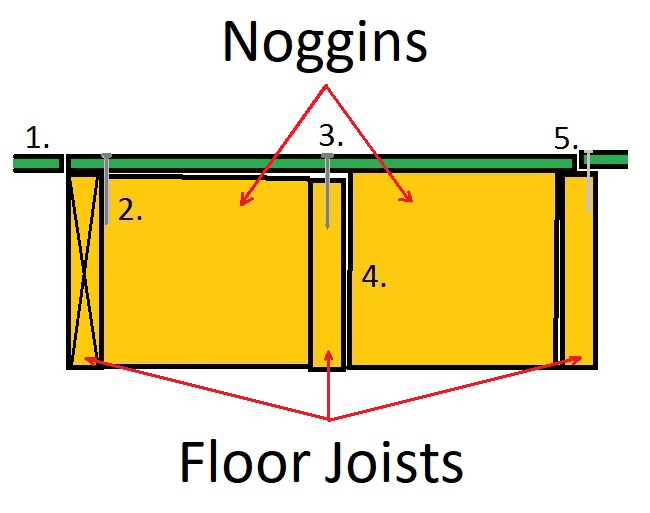
In the image of a floor structure below are 5 common reasons your floorboards are creaking, a sixth one not shown but is explained after:
- Floorboard has been cut short and the join just misses the joist below. Therefore it moves up and down with no support underneath and is rubbing against the adjacent board or against the joist itself. It sounds too stupid to occur but it is really common! This can also happen because someone has cut the floor to access a pipe or something below and not put it back properly with enough support below it.
- During the flooring installation a nail or screw has either missed the joist completely, just caught it or has split out of the side of the joist . This is a common reason why your flooring is squeaky. Because the screw or nail has not fixed the floor down properly it is able to bounce up and down when walked on. Whilst this is happening, the screw or nail is rubbing against the joist below, causing the squeak or creak.
- The third reason your floor could be creaking is because the top of one Joist is too low and not level or flush with the other joists and noggins around it. The nail or screw in this case has not held it down tight against the joist and there is room for the floorboard to flex. As it is dropping down when stood on, then bouncing back up again the fixing is rubbing against the joist each way, squeaking like a mouse.
- Poorly fitted joist ends or noggins, timbers are too short or not cut square. In this instance, when stepped on the floor structure flexes below and the timbers rub against each other because they are not installed tight enough to one another. This can also be caused by timber having been really wet if the floor structure was build in winter with saturated timbers. As they have dried out and shrunk, gaps and movement have appeared.
- Floor squeaking because the floorboards are not fixed down properly. Here the floor board moves down when stepped on and rubs against the adjacent board, or the fixing (nail or screw) rubs on the way up/down.
- Although not shown in the illustration, another cause of a squeaky floor can be pipework. If pipes are too close to each other or they have not been notched deeply enough into the joists they can creak or squeak when the board over them is walked on. Pipes will expand and contract with hot/cold water passing through them so it is really important for plumbers to notch them correctly and that they are below the top of the joist before the flooring is laid. If not enough room, as they expand and contract loud 'knocking' can often be heard too - without walking on the floor.
How do I fix squeaky floors upstairs, downstairs and before or after carpet has been laid?

Once you have identified the most likely cause use one or more of the following methods to fix the problem and stop your floor from squeaking for good:
- If the floor squeaks because the edge of the floor board has missed the joist when laid originally; Sorry to break it to you but this is one of the most intrusive problems to fix. If your floor is carpeted it is unlikely you will be able to fix this without lifting up the carpet unless you have access to the structure from underneath (like a basement without a ceiling for example). In this instance, you will need to cut the floor up and install timbers below for the edge of the floor board to land on. If cutting a square to get access, try and cut back to the middle of the nearest joist. This will mean you only need to install timber where the creak is, and then the two sides back to the next joist so that all edges are trimmed out and can support each edge of the floor board securely.
- If the reason your floor is squeaky is because the fixing has missed the joist below, good news - this could be easy to fix. Simply rip out the nail or screw that has caused the issue, check for pipes/cables, locate the floor joist and then replace with a screw in the correct location that actually pulls the floorboard down tight onto the joist. It is worth putting a couple of fixings in while you are here just to be sure, and even working along the joist a little to be totally sure.
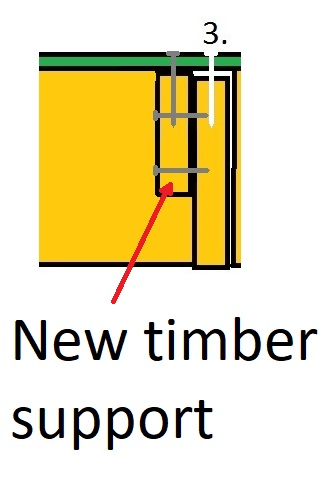
- If your squeaky floor is caused by the joist being too low, you may get away with some longer and stronger screws to pull and hold the floor board down tight against the joists but this may only be a temporary fix. If not, you can either lift the flooring up, place a timber alongside the joist and fix it in the correct position to stop the flooring being able to move downwards like in the picture above, or you could cut thin shims or packers to slide under the floor, filling the gap instead and keeping it up in the right location. If fixing a timber to the side of the joist, remove the old screws and replace with several new ones.
- If ill fitting noggins or bridging are the problem, you will need to be replaced or strengthened with wedges and more fixings to stop the squeaks. Again additional bridging can be fixed straight up against the existing in a similar fashion to option 3.
- Squeaky floors that are caused by the floor not being properly screwed down in the first place are easy to fix. Simply drive more screws in. HOWEVER! Be really careful not to hit any pipework or electrical cables beneath. If you can't tell where any pipes are use a
- If your floor is creaking because of pipework below, then you will almost certainly need to lift the flooring up to get to the pipes. Once in, see where you can chop around the pipes and into the joist to sink them away from the floor board. If they are nailed to the side of the joist, make sure they are fixed well and not loose. Finally mark carefully the position of the pipes onto the floor board before you pit it back, make sure there is enough support for the flooring and replace it with some wood glue and really good fixings.
How do you fix a squeaky floor under carpet?
If your floor is carpeted and you want to repair the creak without lifting up the carets first, you can have a go with a squeaky floorboard repair kit.
It is worth noting that this kit will only work to resolve issues like numbers 2,3 & 5 above which is why some of the reviews on Amazon won't be completely positive about it.
There is no one size fits all for squeaky floors but if you have one of the problems it can fix it may be worth giving it a go before you go to the trouble of lifting up carpets and having to get someone in to relay them for you afterwards.
Below is a video of the repair kit in action, see if you think it could help you with your squeaky floor;
Other pages you may find useful;
Click here for more help installing chipboard tongue and groove floorboards right from the start
Or here for help installing laminate flooring properly
Use the comments section below to add your own squeaky floorboard repair tips!
