How to fit kitchen worktops together and cut 90 degree corners
How to plan, cut and join new or replacement kitchen worktops, sinks & cook top hobs

In this section we'll cover off how to fit kitchen worktops with perfect joins, cuts and edgings. These are also the same methods to use if you are replacing kitchen counter tops to breathe new life into an old kitchen.
There are several different cuts you may need to perform depending on the shape and layout of your kitchen cabinets, whether or not you have a kitchen island and also there can be more involved if installing hardwood counters too:
- Straight cut - simply to cut a worktop to the correct length
- Male and female joints for masons mitres (seamless 90 degree corners)
- Cutting out apertures for sinks and stove tops to drop into
- Cutting a curved end for a kitchen island
- Routering draining grooves in hardwood worktops at the sink (like a Belfast for example)
- Fixing worktop joins together, plus fixing counter-tops to the walls & base cabinets
Tools needed for fitting Kitchen worktops
For the various cuts involved to cut & fit kitchen worktops you will need a specific set of tools including:
Plan your cuts & joins before you start fitting the worktops
If not already done at the design stage the first part of how to install kitchen worktops is to figure out where your cuts will land. These may be blindingly obvious due to the design of your kitchen or they may only be possible to do one way because of the lengths of your worktops.
Other times however you will have a choice and will be able to position them so the counters are balanced visually and joints as string as possible.
When joining kitchen worktops at a right angle / 90 degrees, you need to cut a male and female masons miter. These are cut with a special jig & router. The only way to avoid this is using a metal joint strip but they don't look great and will catch a lot of dirt and bacteria.
Ideally you want to avoid having a worktop join land too close to a cook top/hob because it gets very hot and oil etc. will be splashing around there. Also avoid having a worktop joint too close to a sink where lots of water will be splashing around and also any other aperture or appliance so as to maximise the strength and minimise the chance of any stresses on the worktop join.
Additionally the joins in your counter need to land where there will be ample support underneath and positions available to screw fixings to the walls and cabinets that will keep the worktop joint strong for years to come.
People tend to jump up on and sit on worktops which is worth remembering throughout the installation!
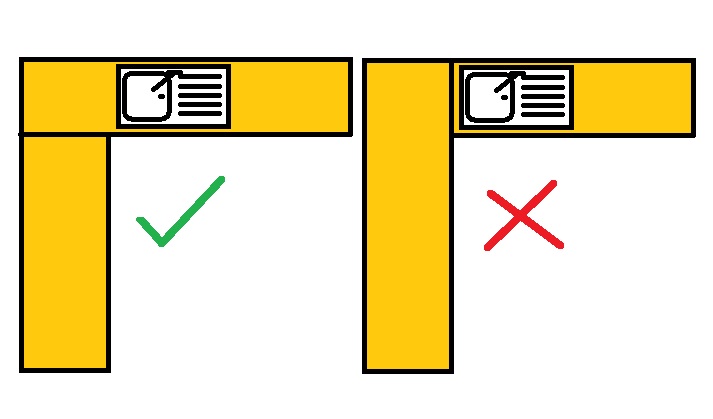
You can see in the picture below an example of where you could choose where to position the worktop joints. By avoiding a join next to the sink the worktop join will not only be much stronger because there is much more material to the left of the sink (instead of a thin strip) but the worktop joint will be exposed to much less water too;

How to fit kitchen worktops - General points to remember
- How to fit kitchen worktops at tiled walls
Your worktops will generally need to be cut in fairly tight against walls, Formica doesn't expand too much whereas for Hardwood worktops you should allow at least 2-3m for expansion per 3m length ( At the back as well as the sides).
The exception being where the wall is going to be tiled. In this instance it is possible to leave a small gap of around 4-5mm for expansion. This will obviously be covered by the tiles and their adhesive and can be sealed (and hidden) with a silicone bead too.
- Cutting the worktops to length
Where you will fit the cut edge of the worktop against a wall and it will not be seen, you can cut it to length with a circular saw. Because a circular saw cuts upward, this must be done from the underside (turn the worktop upside down) in order for the blade not to tear the grain or Formica. You must also cut from the front to the back. For Formica worktops, the circular saw blade must enter at the front edge, because if you come from the back to the front the blade will chip the front edge of the worktop out and ruin it as it comes through the face of the worktop. It is normally easier to mark the underside of the counter top any way as it has a paper backing and pencil lines can be clearly seen.
When cutting to length and the end will be exposed, you will need to clamp a straight edge to the worktop and cut with the router making several passes. For a standard 44mm thick worktop you will need to cut 3-4 times, getting deeper each time until all the way through.
- Support the work-top before getting to work
Always keep the worktops well supported while cutting them, ideally on planks on trestles. If you don't have trestles or anything similar, cut them on the ground with several battens placed along the length. The piece being cut off needs to be supported well too so as not to move at all and cause break out as the cut nears the end.
- Joining worktops together at 90 degree angles and end to end
To fit Kitchen worktops together at right angles you need to cut male and female masons miter joints. These need to be cut with a special Trend worktop jig or similar and a router. A collett is fitted to the underside of the router base, that guides the cutter through precise grooves cut out of the jig.
To hold the join together tightly, a dog bone shape groove is Routered into the underside of each worktop. Special worktop bolt are then used inside the grooves to pull the join tight.