How to fit floating shelves to brickwork walls & plasterboard stud walls
There are three different methods I use to make floating shelves. All three methods are explained step by step here as well as the tools and fixings you'll need for the process.
The easiest method is if you have an alcove to fit them into, but they can be made to float in the middle of a normal wall fairly easily too.
Method 1: How to make a floating shelf in an alcove with three walls
If you have an alcove, this is an easy way to make a shelf that appears to be floating. By fixing a framework to the wall that is then clad top and bottom with plywood, before finishing the front edge with a piece of timber to cover the joins.
- Step 1: Establish the height and fix the rear batten/s
First up, fix a batten across the back wall at the height you want the shelf, use a spirit level to make sure it's perfectly level. I generally use 35mm square planed timber for the battens and framework.
If the wall is brickwork, use Rawl plugs and screws.
If the wall is timber stud, locate the studs and be sure to screw into these.
If you need to fix where there isn't a stud where you need to fix see the tips on this page for fixing into plasterboard
It is a good idea to put some Gripfill on the battens as well before screwing them to the wall
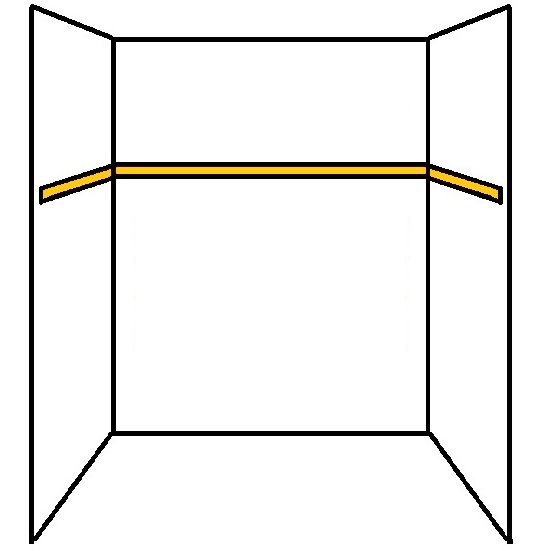
- Step 2: fix battens to the side of the alcove
Next up fix two battens either side as well to support the sides and front batten. Cut another batten to go across the front and noggins in between at around 350mm apart.
To add strength and glue/screw them all on. To fix the noggins I drill pilot holes at an angle and fix with 50mm screws (straight through the face of the front batten into the ends, and to the back batten I would skew nail with screws if that makes sense..).

- Step 3: Cover the top and bottom with thin plywood
Cut, glue and pin some thin plywood onto the top and bottom of the frame to create the floating shelf. Finally, to top it off fix a cover strip across the front to hand the edges of the ply and batten and it's ready for paint/stain.

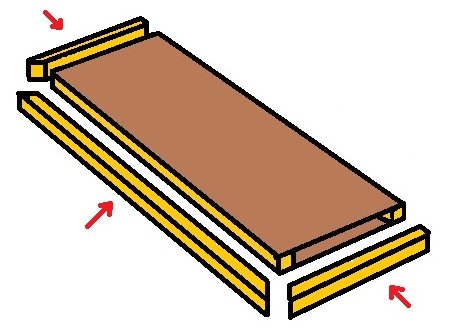
Method 2: How to build floating wall shelves with a hollow core ply door
This is a really cheap way of making floating shelves, especially if you have a leftover off-cut of a door. I would avoid making these too deep, probably no more than 300mm max.
- Step 1: Assess the wall & get a really strong fixing in the back wall batten
First thing to do is work out what the wall is constructed from and decide how to fix to it. If the wall is masonry some brown plugs and 80/100mm screws will do.
If it's a stud wall you want to locate where the studs are first so you can position your shelf where you can get a good fixing. Do this with a stud-finder or hammer and nail (bang a nail in at the height where it will be hidden by the shelf later). Once you know where the studs are you can decide on the length of the shelf, span it equally across the studs if you can. If you absolutely need to fix the shelf and there isn't a stud to fix one end into then use the strongest plasterboard fixings you can buy.
- Step 2: Cut the shelf (door) to size
Rip the door to the width you want. For floating shelves like this I'd stay under 200mm deep. Clamp a straight edge to get a perfect cut with a circular saw. If you dont have clamps, screw a straight piece of timber to the part you are going to cut off. Remember to allow for the thickness of the blade. Cut the door to length after that too. I use a mitre saw, but again you can clamp a straight edge on and use a circular saw. Use a sharp chisel to remove the honeycomb cardboard and glue 50mm from the inside edges.
- Step 3: Plane a fillet infill piece
Now the door will have two edges that are open and need timber in. Take some chunky timber like 50x50mm PSE or similar and reduce it to fit inside the door. Do this with a table saw, thicknesser or electric planer.
- Step 4: Cut and fix
Cut the timber so it will fit first in the end of the shelf, and glue that piece in. Then cut the last piece for the back edge that will be fixed to the wall. Fix the long one to the wall with screws and I put a decent helping of Gripfill on the back edge as well for extra strength.

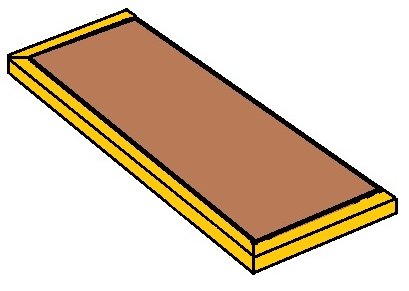
- Step 5: fit the shelf
Glue the wall batten up with plenty of wood glue all the way round and slide the new shelf onto it. Pin it in place with a finish nail-gun or 20mm panel pins (a nail-gun is better than hammering which may loosen the batten from the wall.
- Finally: Tidy up the edges
Lastly I mitre a flat piece of thin finished timber all the way around the front and sides that I've planed to the thickness of the shelf. This is a neat little finishing touch that ensures a nice tidy finish when the shelf is painted and also ensures no unsightly end grain is visible.
Floating shelf method 3: Buy a specialist floating shelf bracket
If you don't want to go to the trouble of making a floating shelf there are lots of ready to go floating shelves and/or special brackets available to buy that just need fixing to the wall.
On this page you can see how I fix brackets to the walls if need be.
What comes next?
Click here to go back to the main shelf page
