How to scribe
timber for a perfect fit
The art of how to scribe timber for a perfect fit can often mean the difference between achieving a perfect skilled finish or a DIY attempt/disaster.
We've all seen cases where somebody has attempted to install something and failed to get it to fit neatly against a surface.
Scribing timber (or anything else for that matter) is one of those jobs that is really easy when you know how and although may take a fair bit of time to suss out and perfect in the beginning does get a lot easier and faster with practice.
When and where do you need to scribe timber?
The need for scribing timber can pop up almost every time you are working with materials that need fitting to one another.
This might be skirting boards (baseboards) to uneven floors or corners, architraves that need installing to a small nib too narrow for a full board, pipe boxing's to uneven walls, ply wood, a door to an ill fitting frame, infill/cover strips, a shelf into a wall/alcove that is out of square, worktops to uneven walls, drywall/plasterboard sheets.
Pretty much any time you are installing timber to something that isn't perfectly flat/level/straight/square or even!
How to scribe - the theory
The idea is to mark a line for cutting away the waste material that is preventing two materials from meeting together perfectly. Because the material will move in exactly the same direction as you have scribed the line, it is important to keep the material you are scribing perfectly level, plumb, straight or parallel. This will ensure it is similarly level/plumb/straight/parallel after it has been scribed in and fits perfectly.
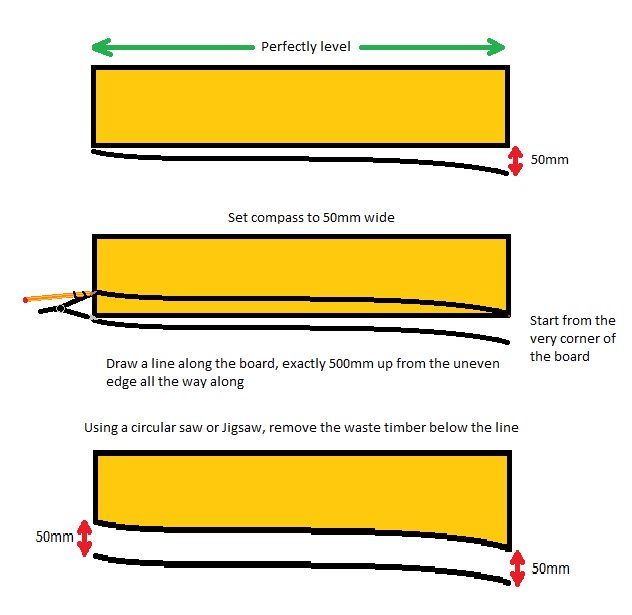
The picture below shows the steps involved for how to scribe timber to an uneven surface. Whilst this is likely to be an exaggerated scenario a typical example for this instance could be timber or a sheet material down to an uneven floor or possibly even a worktop/counter back to an uneven wall - almost anything.

The example above is fairly straight forward because there is a gap of 50mm.
By temporarily fixing or propping the material to be scribed into a level position and setting the compass at 50mm it is easy to mark a line 50mm away from the uneven surface all the way along the edge to be cut in.
You can do this with a compass like in the picture, or alternatively use a scrap piece of timber cut to exactly 50mm thick.
It becomes a little more complicated when you are scribing a worktop or anything else whereby a parallel overhang is required at a set distance instead of simply scribing it down flush.
How to scribe a worktop with a parallel overhang or margin
When you are scribing a worktop back to an uneven wall, the counter would likely need to have an overhang of around 20mm from the face of the cabinet doors.
If the doors weren't installed on the cabinets yet you would need to allow the thickness of the doors plus the 20mm overhang as well as allowing for the deviations or protrusions in the wall.
Therefore place your worktop on the cabinets to scribe it and measure the overhang making sure you are parallel at both ends.
One edge of the worktop or possibly the middle if the wall is bowed outward, would be touching the wall. You would measure the overhang at the outer most point and this would be the same measurement for the rest of the worktop to overhang the cabinets by. Say for example this is 55mm.
You have 20mm doors to go on, plus 20mm overhang to leave on top of that, therefore you would need to set your compass at 15mm in order to remove the correct amount of material. With 15mm scribed and removed, the material will move back to leave a consistent 40mm overhang.
What tools do you need to scribe timber with?
A compass is great for scribing in most situations. Additionally, often you can simply cut a piece of timber from scrap to the correct width you need and use that as a guide to run your pencil along in a similar way.
Whilst not cheap, if you want the ultimate adjustable tool to help you scribe timber accurately then there is no comparison to the Trend Easy Scribe tool.

The tool has a flat base that helps keep it steady whilst marking. Because it has a wheel to adjust small increments are easy and Click here to view reviews at Amazon.co.uk
The tool and blade you use for actually cutting the material will depend on the material you are cutting. Tools can range from a circular saw, Jigsaw, electric planer, hand saw, or even just a smoothing plane if only removing a small slither of material.
I always 'back cut' the material wherever possible. This means removing more from the back edge of the material that will not be seen so the face has a much easier job of moving in tight.
Use the comments box below to add your own tips on scribing timber to uneven surfaces