Installing Stairs and Timber Staircase Components
How to install a staircase, the handrails, balustrade & spindles
This section about installing stairs includes:
|
How carpenters go about fitting staircases and balustrades can vary from country to country. I think in the USA stairs are generally built on site in-situ, whereas here in the UK staircases are generally pre-made in a joinery shop and then delivered part assembled to the building site, ready to be assembled and installed. Instead of installing stairs either of these ways in Western Australia where I have also worked, the staircase is quite often concrete and so the form-work carpenters put the shuttering and re-bar together on site for the concrete to be poured into. Sometimes the joinery shop will provide the handrails and newel posts (if needed) already mortise and tenoned with the staircase ready to assemble. Some of the treads and risers may be cut but left out to fit after the installation in order to keep the weight of the staircase down during transportation and fitting. There are several regulations that must be met when designing and building a staircase and its balustrade. The regulations differ in domestic construction to what they are for commercial or public buildings. |
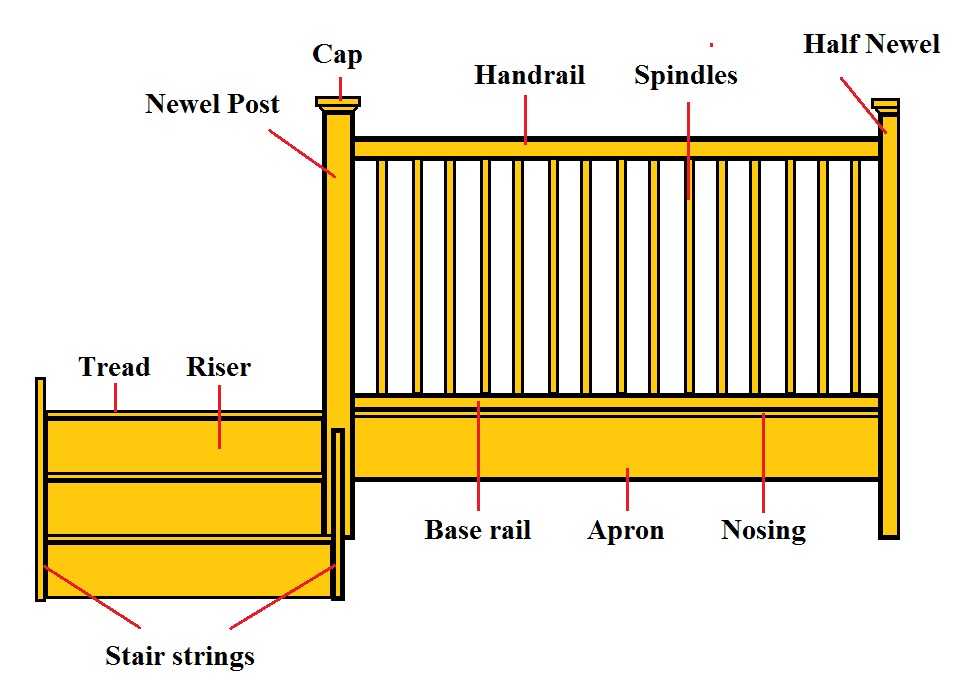
Stair component diagram
 |
All the information in these pages is intended as a general guide to domestic staircase regulations and you should double check the building codes and regulations applicable in your area before planning any work.
There are also several variations on the design like cut string and open tread for example, but the picture above shows the common terms and components that make up the structure of the staircase before the balustrade goes on. The balustrade is there for people to hold on to and also stops them falling off the edge (where there's blame there's a claim..). It traditionally consists of newel posts, hand and base rails and spindles, although installing stairs with toughened glass balustrades instead has become fashionable nowadays in modern properties too.
When designing a staircase the crucial measurement is the vertical one from 'floor to floor'. This is divided by the number of treads to give the height of each individual tread, and they must all be exactly the same height. If not, people will trip up or down the stairs.
The 'going' is the horizontal distance a person will walk as they scale the staircase. On a straight flight this is divided up to give the equal depth of each tread. The easiest way to remember this is to visual how far are we going forward, if travelling on a flat floor. This is measured from the front face of the first riser, to the front face of the last riser.
Installing stairs:
The first thing I do when I am installing stairs step by step is to check the floor to floor measurement, and the overall height of the staircase (multiply the height by the number of treads). It's important these two measurements are the same otherwise the only way to get it in is to adjust the height of either the stairs or the stairwell, or by installing stairs out of level - not ideal.
Stud-work and plaster-boarding / meshing the stairs
After installing stairs the underside of the staircase will need to be plaster-boarded, ready for plaster. There are building regulations that stipulate what type of board needs to be used depending on the use of the staircase, typically it should have at least 1/2 hours fire resistance.
Sometimes the side of the stairs will need to be encased with stud-work to build a cupboard or cloakroom under the staircase, and the side can even be given a paneled look to enhance the hallway. Paneling can be done with anything from MDF sheets and decorative beading or Oak, to tongue and groove boards.
Install the newel posts
Newel posts come in a variety of styles and sizes. In some older houses the bottom newel is referred to as a king post, and is larger than the others further up the staircase. Square newels (full height) or turned posts are available. Stairs that are having turned newel posts generally have newel bases installed that the top turned part of the post can be slotted into later on. It's not normally until after plastering that the newel posts are installed into the bases. The handrails are fixed to the posts, and along a gallery will often need to finish at a wall. In these instances a half newel is fixed to the wall, to screw and finish the the handrail to. Balustrade and nosing construction
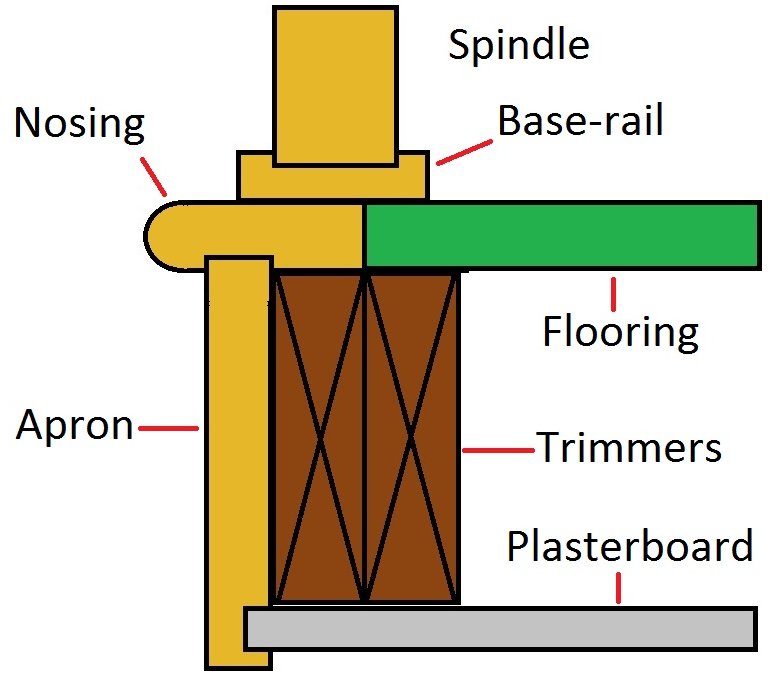
There's more to installing stairs than just fitting a staircase. The picture below outlines the components needed to form the balustrade that goes with it; |
 |
The balustrade consists of an apron that covers the joists trimming the stairwell. A nosing sits on top of that flush to the flooring with an overhanging Bullnose (round edge).
A half newel is fixed to the wall opposite the newel at the top of the stairs. A handrail and base rail are cut in between and fixed to newel posts that have a channel housed out in the middle. The housing is the same width as the stair spindles being used, and they sit inside the channel. Then a fillet is cut to fit between the spindles and fill the rest of the channel. To finish it off, newel caps are fitted to the top of the posts to cover the end grain and enhance the appearance.
When you install the hand-rail and base rails they are usually the same length (unless the stairs are cut string, when the spindles sit down on top of each tread instead).
When the balustrade is constructed on a gallery or landing like above, the nosing and apron are installed to cover the trimming joists and for the ceiling underneath to stop into. The nosing is the same thickness as the flooring and is used because the edge of the flooring needs to be hidden when walking down the stairs. The Bullnose/round over moulding can easily be achieved with a router and round over bit (the same one used for making window cills). The join between the flooring and the nosing is covered by the base rail that the spindles sit into, and the carpet butts into the base rail. Older homes like Edwardian & Victorian for example don't always have a base rail and the spindles are housed into the nosing instead. This means the carpet has to have a trim to fit the edge into where it meets the spindles. If renovating an old staircase it's often better to install a base rail for new spindles to fit into.
Next, you calculate how many spindles you need, and use an infill strip of the same width cut in between the spindles to denote the spacing size and fill in the gaps. Standard spindle sizes are 32mm, 41mm and 50mm and there are different formulas to use to find out how many you need, depending on the size. Click here to find out how to get the spindle spacing's perfect.

Have a comment or question about installing stairs?