How to apply a Leading Edge to doors so they close tighter and without binding
What is a leading edge, how is it useful and how do you cut one?
There are several areas in which you might use a leading edge. It is simply a means of cutting an angle onto a piece of timber so that it can move into position more easily. That might be onto a joist or noggin that is too tight to get in, a spindle spacer that is a bit tight too and just needs a helping hand, or most commonly the edge of a door that is binding against the frame.
Door leading edges, for tighter fitting doors
When hanging a door, a leading edge or slight angle is applied to the vertical lock edge of the door in order to help it close tight against the frame without hitting it first. When a door is closing and therefore at an angle to the frame, it is very slightly longer than it's overall width. Because the door swings in an arc, without a leading edge quite often the door will bounce off the frame instead of closing against the door stops.

It is not always necessary to apply this on all doors. As a rule, the narrower the door or the thicker the door the more likely you will need it. Without applying this angle, you would most likely need to trim so much off the width of the door there will be a large unsightly gap when it finally closes against the stops.
Another door that will almost always need a leading edge is an angled one like those found for a cupboard under the stairs or in a loft conversion. Because the top flat edge is so short and close to the hinges, it will not close without an angle being planed or sawn onto the angled edge of the door.
How to cut the leading edge onto a door
There are a couple of ways to apply the angle depending on your skill level and the tools you have available. If you only have a basic set of tools you can use a hand plane. Some websites recommend using a panel saw to cut the angle before smoothing with a hand plane but the angle is so slight and so little timber is removed it is difficult to get enough purchase to cut a thin tapered slither off.
If you have power tools an electric plane is perfect to apply the angle with. I set the door up in my saddle and block before holding the front edge of the plane slightly off to one side before walking the plane up the length of the door. If you apply too much of an angle it will look odd as your mortice latch will highlight the door being cut slightly out of square.
Applying to an angled door
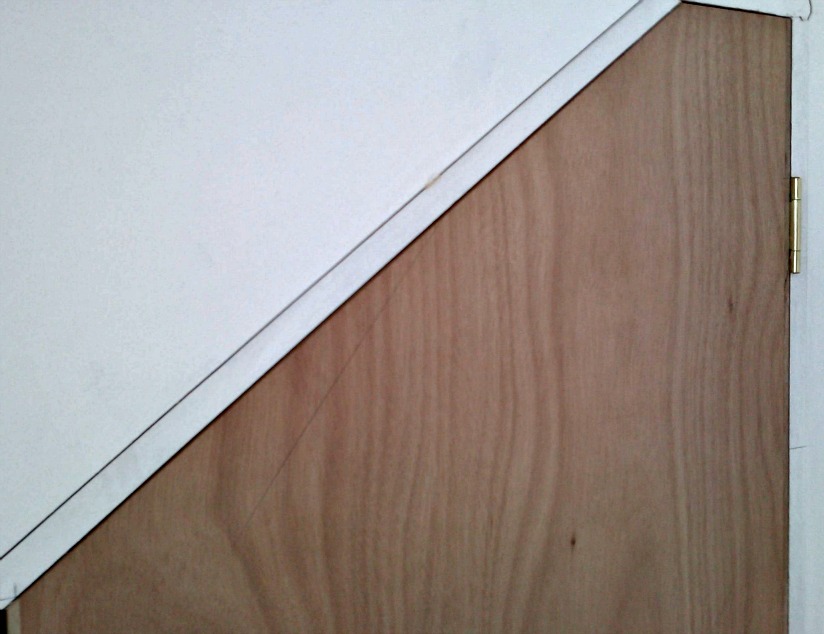
Take for example a ply flush door that you want to hang to close off a cupboard under the stairs. For the frame you have put a slight horizontal head at the top instead of having an angled door that goes all the way to a point and looks silly.
>Next you cut the door to size and fill the gap with a piece of timber you have planed to the exact size like the picture below, applying lots of wood glue.

After clamping the door up and leaving it while you have another cup of tea, you are ready to apply the leading edge. In this instance I used a plunge saw with a guide rail (you can use a normal circular saw and clamp a straight edge to the door instead) and set it over so it is cutting just out of square. Put the rail on the door flush with the angled edge and run the saw along it, removing timber from the side that will close into the frame first. It now looks like the picture below;
Because of that angled being applied, it is now possible to hang that door leaving as small a gap as the one below, without the angled part of the door hitting the frame as it opens or closes. Once architrave is installed it will look really tidy.