How to hang a wooden Stable Door with two door leafs (top & bottom)
A wooden stable door is what you might picture in a stable with a horses head sticking out of it - which it is!
But they are often installed in country or older style period properties as well, and are ideal for keeping the dog (or kids) outside in the garden whilst letting some fresh air into the house.
|
Slightly different to hanging a normal exterior door, hanging a wooden stable door is a lot more work than fitting a single exterior door - even more than twice as much. The door itself is made up of two separate halves or leaves, a top and bottom leaf that can be opened together or only the top half leaving the bottom closed. Some really nice glazed versions are available like the one I am hanging here in this cottage. As mentioned there are two leafs to hang, one top - one bottom. There is also two weather mouldings, a door handle with a mortice lock, a bolt to hold the doors' to each other and bolts or locks to hold each one closed as well I always start by hanging the bottom leaf first. It has to be fitted so the top of it is perfectly level and then the top leaf can be rested on that and hung/marked out afterward. |

How to fit a wooden stable door - step by step
If the door isn't perfectly level, when both halves are opened together they might 'bind' (tighten) against each other in the middle or the bolt holding them together will become really stiff under that tension. As long as they are both hung perfectly plumb, level & parallel to one another they will both swing perfectly together.
The door in this instance opens inward and the bottom needs to be rebated over the weather bar.
Before starting anything though, I measure the height inside the frame from top to bottom, the doors combined height needs to be around 7-8mm less.
There will be a 3mm gap top, the bottom, and another 3mm gap in between. (I know that makes 9 but I like to have a couple of mm spare in case the head or bottom needs to be scribed in at all).
The rebate on the bottom half of the stable door needs to be exactly the same depth as the weather bar protrudes up out of the frame. In this instance it was 12mm so the rebate will be 12mm tall.
Important! Before setting out the rebate on the bottom of the door, make sure the door is the right way round and the rebate at the top of the door is facing the right way. The tallest part of the rebate needs to face the outside, so the upper leaf of the stable door will hold the bottom closed. The bottom should not be able to open unless the top is open!
To cut the rebate you can use a circular saw with a straight edge, a router with straight cutter and fence attached or as I did in this case a Dewalt plunge saw with guide rail.
Lay the stable door flat and set the fence or straight edge so the saw will cut the same height as the weather bars height above the cill.
 |
 |
The depth of the blade/cut can be worked out by measuring from the front edge of the frame back to the front of the weather bar, and adding a couple of millimeters.
Before cutting, use a Stanley knife to score the narrow edges of the door to prevent tearing the grain out when the saw blade comes out the end of the door. If using a circular saw, score the whole width of the door with the Stanley knife too.
Once you've made a few cuts with the saw, clean the rebate up with a chisel and sandpaper before trying the door in the frame.
Use small wedges and a spirit level on top of the door to position it perfectly square and level in the frame before marking anything that needs to be scribed or planed off.
Mark the hinge positions on the bottom leaf of the stable door as around 50mm down from the top, and 150-200mm up from the bottom.
 |
 |
Chop the hinges in exactly as you would when hanging a normal door. There should be a perfectly equal margin all the way round each door, including in between each leaf of around 3mm.
When the bottom is hung and I sit the top on to mark it, I use 3mm packers or some cardboard in between the two halves to pack the top door up the right amount.
If the gaps aren't tight, especially the join then it's likely a draft will get through.
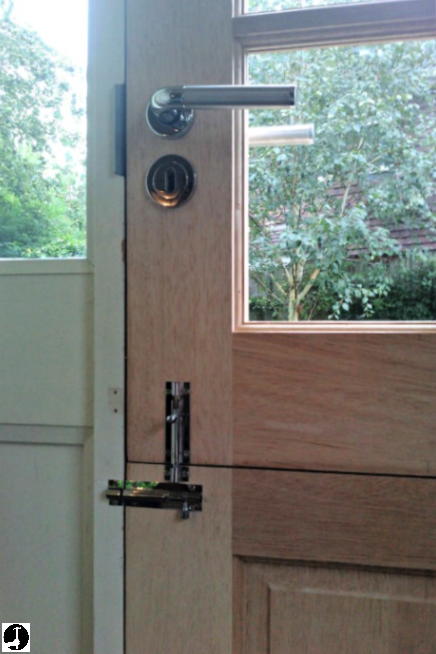
Once both halves of the stable door are hung, It's time for locks, bolts and handles. The bottom is held closed by the top door but it still needs locking as well.
In this instance a normal 5 lever mortice lock and handle with escutcheon plates was installed on the upper leaf. Click here for help fitting mortice latches and locks.
I also fitted a barrel bolt from the top door to the bottom one to lock the two together so they could be opened as one. Another barrel bolt was installed on the lower door to hold it closed independently of the top door.
And I fitted a pair of Yale rack bolts like these one top & also one bottom for extra security.
Both leafs of the door need a weather moulding. Water will run down a surface until it reaches the lowest point, at which it drips. Weather moulds have a groove machined into the bottom (called a drip) that gives a moulding it's 'lowest point'. When the water reaches the groove it will drip off instead of running further - and eventually ending up inside.
 |
 |
To fit the lower weather mould, I cut it 20mm wider than the gap between the frame. Then, close the door and hold the offcut in position (flush with the bottom of the door) and mark the shape of it on the frame. To remove this I use small chisels as it's normally too close to the cill to use a router.
The picture on the right shows the drip mould on the top door. Because the door opens inwards, it has to be cut in between the door stops. I close the door, mark the stops on the face of the door then open it and hold the moulding up to one line, then marking the position of the other.
Fix it by gluing with water proof PVA and pinning with 30-40mm panel pins.
")
Related pages you might also find useful;
Click here to go back to the main page about hanging doors
Click here for more step by step tips for hanging a door
Or here for more help fitting a mortice latch

Use the comments section below to ask questions or to add your own tips for fitting stable doors;