How to Install Kitchen Cabinets
Fitting Kitchen Wall and Floor Units
Install kitchen cabinets perfectly by following the step by step guides on these pages!

Tools needed to install kitchen cabinets
Alongside the materials you are going to need a spirit level/s (preferably a few different lengths), tape measure, at least two strong clamps, hammer, some wedges/shims, a hammer drill & Rawl plugs and/or decent cavity fixings if you have stud/Gyprock walls plus a drill/driver. If you are fixing to hollow masonry walls you will need some decent masonry fixings that expand in the wall too.
Setting up the base units
I always start by installing the kitchen base cabinets first, as the height these are at will later determine the height of the wall cabinets. Additionally, I install the doors at the end to keep them out the way. It also makes the cabinets lighter to handle and to keep them from getting damaged or dirty.
The first thing to do when you install kitchen cabinets is establish the floor level with a long spirit level. Your cabinets will likely have plinths underneath (often called kick-boards), sometimes these clip straight to the legs on the bottom of the cabinets. The plinth height will govern the height of your base cabinets. You need to start at the lowest part of the room if the floor is out of level because if start at the highest point you will end up with a large gap over the plinths where the floor falls away lower. Really the floor should be as flat as possible and leveled if it is too bad.
To determine which height to install kitchen cabinets, measure the height of the floor units, of the plinths and also the tiles or floor covering if not already laid. The units I am installing here are 720mm high and the plinths 170mm tall, making the total height 890mm to which you can add 5mm tolerance. If the floor is to be tiled for example, add the thickness of the tiles and grout too.
Again starting at the lowest point in the room, I use a 1800mm spirit level to mark a level line to that measurement around all the walls at 895mm that I will install kitchen cabinets. That will be the top of the base cabinets and the bottom of the kitchen counter / worktop.
These particular kitchen cabinets come with plastic legs that are height adjustable. Unwrap the base units and screw the legs onto the bottom. I adjust all these to 175mm (height of plinth + 5mm but add your flooring thickness if not already laid) before screwing them to the bottom of the cabinets. As you can see in the picture below, the front of the unit is on the left and the feet have a flat part which should face the front for the plinth to butt up against. Also, the flange should overlap the outer edge of the carcass otherwise all the weight is being loaded onto the bottom shelf of the unit and the dowels that hold the two together. People often sit up on kitchen counters, and if the kitchen is having granite worktops as well and the legs aren't fitted like this there is a good chance the weight will eventually ruin the bottom of the carcass. (If they are having granite counters then before putting the plinths on right at the end of the job you can cut solid timber blocks under the units for extra strength).

Fixing the base units to the wall
Wall and base units can be supplied either with solid backs that you can screw straight through or french cleat style brackets that screw to the wall and have corresponding clamps inside the unit that hook over them. These clamps have screws in them to finely adjust the units height. In this instance they generally have a hardboard backing that is not strong enough to screw through.
If your kitchen cabinets have a solid backboard that is pilot drilled and countersunk, that you can screw them directly to the wall. These cabinets may be less adjustable so it's important to get the unit at the exact height before drilling into the wall.


Once the units are in position the bracket positions can be marked on the wall like above. Then I remove the units and fix all the brackets to the wall.
If the first cabinet butts up to a wall, it is definitely worth screwing into the wall too. The main thing to watch out for is if the wall is out of plumb, your bottoms will all be level but the sides not. This will cause problems when your doors go on as they will all be perfectly square. When screwing through the side of the cabinet make sure to pack some shims against the wall to keep it perfectly plumb. Install kitchen wall cabinet 1 perfectly plumb and level and the rest will flow smoothly.
Fix the units to each other
It's important when you install kitchen cabinets to also fix them to each other for extra strength, and to keep them all nicely lined up with each other. I always clamp the units together in the right position and to stop them moving before drilling a hole straight through for the bolts. Ideally these want to be located in a discreet/least visible position. Sometimes you can fit them behind hinges or where a shelf will later hide them from view. I will often line the wall cabinets up on the floor, clamp them together there and drill the bolt holes. That way once you get them on the wall the drilling is done and it is just a matter of bolting them together, something that is easy on your own with the batten on the wall for them to sit on too. If you put some scrap MDF on the base cabinets you have your drills etc within reach / handy while you work too.
TIP: Laminated cabinets especially but even solid timber can break out when the drill bit comes through. Hold or clamp a scrap piece of timber on the other side when drilling to prevent annihilating the inside of the cabinet when the drill bit breaks through the material.


Once screwed together and to the wall you can level across the width and from front to back by adjusting the legs. I always use a framing square to check that the front of the cabinets are square too. If you don't install kitchen cabinets square and level it will be impossible to get the doors to all line up nicely at the end.
Fixing kitchen wall units to the wall
You can follow a similar process to install kitchen cabinets to the wall as above once you have determined the height they will need to be fixed at. Apart from personal preference if nothing else matters, there could be three different factors that make up your mind for you.

Step 1: What height should the kitchen wall cabinets be installed at?
If not specified on the plan, the height of the kitchen wall units can be governed by a couple of things. Firstly, if there is going to be a tall larder unit like in the picture above, the bottom of that will be flush with the bottom of the other base units so the plinths flow underneath. This means the top of the larder cabinet can determine the top of the wall cabinets. This is important, as the cornice if you are having one will need to fit continuously round the tops.
Another way if there is no larder unit may be the height of the tiles. If the kitchen is having 4 rows of 150mm tiles you may want to put the bottom of the wall units a little above the finished tile height (from the base cabinet this would be worktop thickness + 600mm + enough for grout and tolerance).
Additionally, an extractor hood may also give the answer. Sometimes they are built into a shorter wall cabinet and need to be a set distance above the hob (600mm for example - check the regulations for your country) so set that out first to ensure you comply with the regulations by measuring 600mm above the hot plate/hob, add the height of the extractor hood then of the cabinet that goes above it. The top of that will be the top of all your kitchen wall cabinets.
Step 2: How to fix kitchen wall cabinetsThe easiest way I've found to install kitchen cabinets to the wall is to mark a perfectly level line for the bottom of the units and fix a batten temporarily for the units to sit onto. This as well as being a level line to sit them on is also a good support when you're working on your own. Quite often the wall units will have the same french cleat style brackets as the base units and I also screw through the bottom of the units back into the wall for extra strength and support.
If hanging wall units on a masonry wall it is OK to use brown Rawl plugs and suitable screws. When I'm fixing the kitchen wall cabinets to a plasterboard wall I always use the Rawlplug setting tool. This is pretty much the strongest fixing you can get in hollow cavities like plasterboard if you can't fix straight into a stud (for cabinets with cleats you may have no control over where they need fixing). The plugs are like rivets and are strong enough to take the weight of a kitchen cabinet as well as all the tins of food/plates etc. that are going to get loaded into it.
Hang/install kitchen cabinet doors
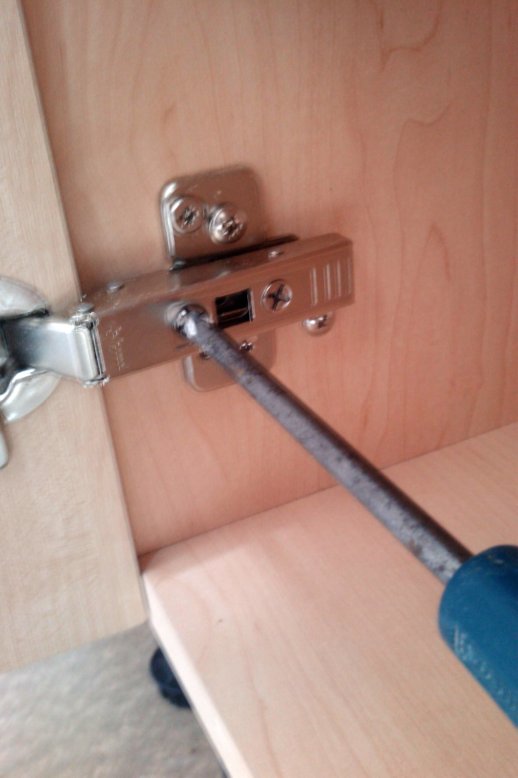
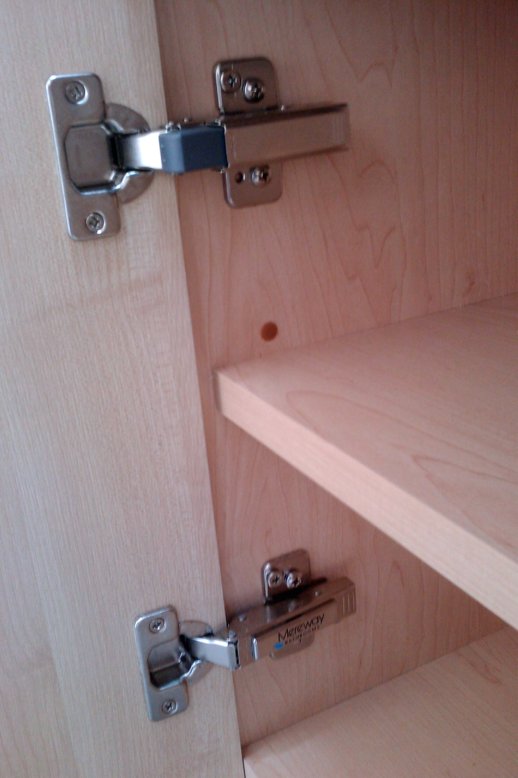
To install kitchen cabinet doors is fairly straight forward if you've got everything right before hand. Most off the shelf kitchens use concealed hinges. These are adjustable and can open to 110°. Part of the hinge screws to the door the other to the unit and the holes to screw into are either pre-drilled or marked with a pinhole.
Once each part is screwed on, the door can be offered up to the cabinet and the hinges simply click in, front first. You may have soft closers to clip onto the hinges too, leave them until all the adjustments have been made.
Once on, the doors can be adjusted up and down, left and right + forward/backward a little by tweaking the screws inside the hinge with a screwdriver. If adjusting the cabinet doors up and down, mark the position of the hinge with a pencil before loosening the bracket. This indicates where you were before, so you can move it up/down before tightening. When they all line up perfectly click the soft closers onto the hinges and the little cover caps if supplied.
How to install kitchen cabinets handles
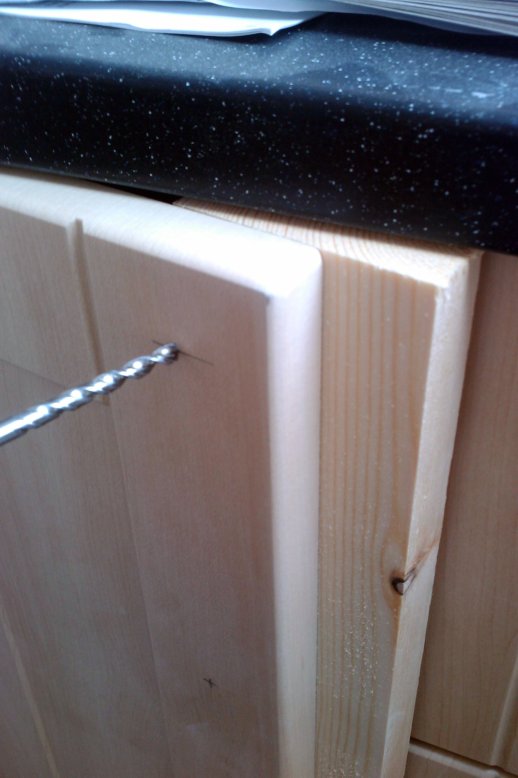
Quite often the position of the handles are marked with a pin prick inside the cabinet door. I always double check the positions line up exactly with the screw holes in the handles and make sure the client is happy with where they are. As in the picture below I always hold a scrap piece of timber on the back of the door I'm drilling to prevent damaging the surface when the drill bit comes out .
What's next?
Once all the units are fixed in place, you are ready to move on to fit the kitchen worktops.
Click here to go back to the main Kitchen installation page

Have a question or comment about how to install kitchen cabinets?