Fitting Noggins
Bridging, Blocking & Herringbone struts in joists, stud-work and roofing
Noggins, sometimes called bridging or blocking are timbers used all over the place during first fix/structural carpentry to strengthen and stiffen wall, floor and other timber structures.
Noggins help to straighten out wall studs and floor joists and they are also used to provide a strong fixing for something that will be later fixed to the structure. For example, you may specifically place bridging timbers when building an interior Stud-work wall in such a position as to provide a solid fixing for the toilet cistern to screw to, a radiator or perhaps a large flat screen TV that will be installed to the wall later on. Bridging is needed in walls to carry the edges of plasterboard sheets so the joints are strong and don't crack.
In floor structures it can be the case that extra noggins are also installed to help carry the load and edges of a shower tray, or a non-load bearing wall or nib that happens to land between joists for example.
Cutting and fixing wall and floor bridging
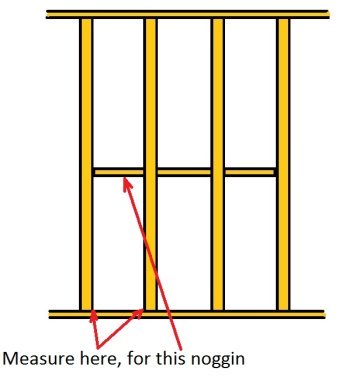
By taking the measurements for your bridging at the end of the studs or joists where they meet the wall plate instead of where they will actually be placed, you can ensure your noggins will cause the studs to straighten up and become parallel with one another.
For Example:
You are cutting blocking for a standard interior wall that will be fixed with the centre of the timber 1200mm up from the floor to strengthen the wall and provide a fixing for the edge of 1200mm wide sheets of plasterboard later on. You must take the measurements for the noggins in between the bottom of the studs where they are fixed to the floor plate, not at 1200mm high. You do this because the tops and bottoms of your studs should be at equal distances from each other, therefore this method ensures that no matter how bowed or twisted they will then be forced straight, plumb and parallel with one another:
Normal/Straight Bridging
Normal bridging in a wall like above would be fixed in a straight line, with the centres being 1200mm above the floor. One end can be nailed straight through from the back of the stud. The other end has to be skew nailed at an angle because the previous block is in the way of nailing straight.
Staggered noggin
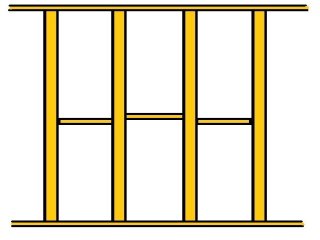
Staggered bridging can be used where the blocks don't have to carry the edges of a sheet material like plasterboard. Floor joists are one area where staggering the bridging would be OK. By staggering them you can install much quicker because you don't have to skew nail one end which is slightly more awkward and thus more time consuming. Both ends can be fixed straight through the back of the stud/joist, which can be easier, quicker and a stronger fixing too.
Herringbone struts
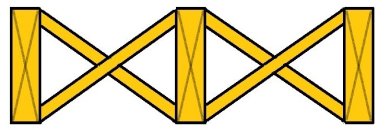
Herringbone struts are sometimes used instead of solid block bridging/noggin and can be an easier way to straighten troublesome timbers out.
They can provide a good solution if there are lots of flexible pipes or cables that need to be passed between particular joists as they reduce the amount of drilling that needs to be done that effectively weakens timbers and structures.
Sometimes although the majority of my floor structure has solid bridging, I will have an area with herringbone struts so the plumber & electrician have a easy route to pass their pipes & cables through.
Setting out herringbone struts
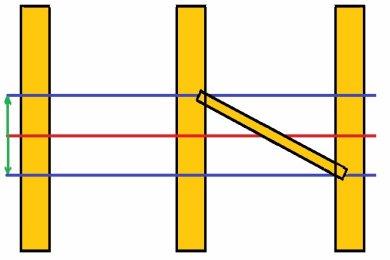
It's impossible to hold a piece of timber in place to mark the length of a herringbone strut. Instead, to set out and fix herringbone struts you need to set out the depth of the joists onto the top of the joists. First, mark a center line across the joists where the struts will be placed, mark this along the bottom of the joists if possible also, to help lining them up when fixing later. That line is marked on the picture above in red. Then, mark half the joist depth either side of that center line, marked in the picture in blue (joist depth shown by green line + arrows).
Once done, you can hold the timber being used from line to line as shown on the right hand side of the picture to mark the length and angle needed onto the strut.
Once cut, nail in place. This method of bracing also helps to straighten up twisted joists, as long as you don't adjust the lengths in any way. Fix the tight struts first (straightens joists) and leave the loose ones till last.
Click here to go back to interior wall framing page.
Click here for help fixing a squeaky floor.

Have a comment or question to ask about cutting and fitting noggins?