Interior Wall Framing
How to build strong studwork walls
|
Tips in this section include: |
 |
You'll often have to build studwork partition walls on site during the framing stages of the job. They can be built to completely partition a room, divide a large room into two, to form a corridor or hallway, or build a nib for whatever reason. It's really important to build them correctly and level/plumb to save yourself loads of problems later on. If you don't get your stud work walls level, you'll have much more work making the plasterboard fit, scribing each board in. And, not enough vertical studs will not only mean a weak partition wall that flexes but you'll have difficulty when it comes to fixing the skirting boards or anything else to it later on.
If your interior wall framing is out of level there's also a chance the door will swing open or shut on its own! These are just a couple of the problems that can result from poor interior wall framing and why it's worth taking a little time to get it right now, that you'll more than save later on.
The picture below shows a typical timber partition wall, consisting of vertical studs in between the top and bottom plate, and noggings/bridging in between the studs. Noggings add strength/stiffness and are also fitted at the height where the sheets of plasterboard join to prevent movement and cracking between the two board edges.
Typical stud wall components

The most common method of interior wall framing is to build them in-situ (in place) on site as opposed to pre-building them in a joinery shop and then re-assembling them on site, although some projects require the latter method.
Timber stud walls are generally built using either 75x50 (3x2), 100x50 (4x2) or 125x50mm (5x2) timbers to form the top and bottom plates, studs and noggins. The size to use and the distance between studs will depend on the purpose of the wall - whether or not it is structural for example.
After framing an interior wall it will need to be insulated and sheet material like plasterboard installed. It may also need a door lining/frame (unless it is a solid partition).
Tools and materials I use for interior wall framing:
You don't need loads of particular tools for interior wall framing but having a circular or miter saw and a framing nail gun will save a lot of time and make the job easier.
Interior wall framing step by step:
Step 1: Select the top and bottom plates
The top and bottom plates should be the straightest two lengths of timber in your stack. Find these, and if you come across any really bowed or twisted lengths set these aside to be cut up into noggings later.
Step 2: Cut the floor plate (or sill) and fix down
Cut the bottom plate to the required length, this may be in between two external walls for example. I find the easiest way to form doorways is to fix the plate down on to the floor and cut it out later. This helps ensure a straight wall.

Where there is a corner in the studwork wall lay the plates out as above, with studs in enough places to carry the plasterboard edges.
If a wall needs to intersect like a T-shape set out the plates like below so again the studs can carry the plasterboard edges. In between the studs cut some small noggins to fix and bind everything together with.

If a door lining needs to be installed at a t-section like above don't fit it tight up against the wall. Instead, fit one or two studs first so there's enough room to get an architrave up that side of the door, like below.

Step 3: Set out studs and transfer to head plate
The number of studs will be on the technical drawing and should relate directly to the size of plasterboard needed. If you are using 2400mm plasterboard for eg. the centre of a stud will measure 2400 from the end so where the ends meet they can both be fixed and supported by the stud. Then more studs are placed in between that and the start at equal increments called centres.
Walls are typically built with 400, 450, 500 0r 600mm centres. For this example we will assume 400mm centres, and 2400x1200mm sheets of plasterboard.
Metric and imperial stud/joist/rafter centers
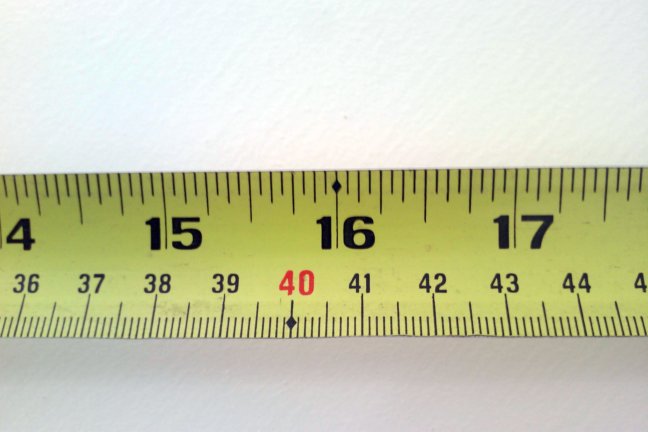
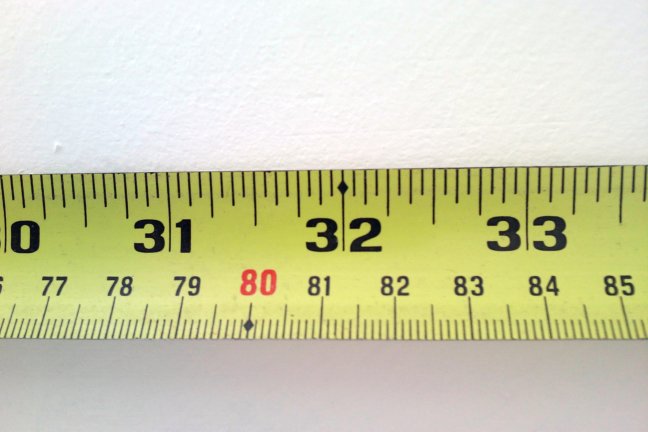
You can see in the pictures above that tape measures are marked for setting out centres. At 400 and 800 there is a small black diamond and the numbers are red. There's also a black diamond at 16" and 32" for those working in imperial. This continues for the length of the tape measure.
There will be a stud at each end, mark out the rest of the stud centres on the floor plate, and lay the top plate on it and mark that at the same time. The first is 400 then 800, 1200, 1600 and so on.
Step 4: Set out doorways
Determine the position of the doorways. In order to set out the doorway you will need to take these dimensions:
Once calculated set the position of the doorway onto the plates.
Step 5: Fix top plate to ceiling/joists
Plumb a line up from the bottom plate with a long level and a straight edge to mark the position at each end. With the top plate laid on the bottom plate measure down from the ceiling to get the length of the studs required at each end. I add 3-4mm to the measurements and cut two studs.
When interior wall framing on my own I find the easiest way to get the top plate fixed is to nail the bottom of one stud to the base plate about 200mm in from the end and lean the top of it against the wall. Then rest the top plate on that, and lift the other end up and support it with the opposite stud. From here I can adjust the position of the top plate before fixing it.
Step 6: Cut base plate out at the doorway
Screw the base plate either side of the doorway so that it doesn't move when the plate is cut out. Cut the base plate out with a circular saw (set to the right depth)or handsaw.
Step 7: Cut and fix studs
If the floor and ceiling are level the studs could be cut to the same lengths otherwise they'll each need to be measured and cut individually. Take a list of all the measurements needed, including the two longer ones where the base plate has been cut out. Cut all the studs in one hit, label/number each one as you cut it.
Fix them all in place, leaving out the doorway for now. 75 - 100mm round head wire nails are fine if you don't have a framing nailgun. 3 or 4 skew nailed into the top and bottom of each stud like below.

Step 9: Fit the doorway header
Cut a piece of timber to the same width as the gap between the doorway studs on the floor. This is important, so as to keep the studs parallel in case they bow in/out a little. The height to fix this at is calculated by adding;
When nailing this in place use a spirit level to double check as well so your interior wall framing is spot on.
Step 9: Cut and fix noggins/bridging
The noggings, blocking or bridging as they are sometimes called are fitted to add strength and carry edges of the plasterboard between studs. The height they are fitted at will depend on the size of the boards, 900 wide boards and the noggings need to be 900mm off the floor, to the centre. 1200mm boards and they need to be 1200 and so on.
All the studs should be level, but may bow a little so get a cutting list for all the noggings by measuring the distances in between them down where they're nailed to the base plate. That way when they are fitted at the right height they'll help to straighten up the studs.
Click here for lots more information about cutting and installing noggins
Step 10: Install the door linings
Once the stud work wall is complete install the door linings so they are plumb, level and in wind.
Step 11: Plasterboard
Now the wall is ready for you to start cutting and fixing plasterboard to it.

Have a comment or question about interior wall framing?