3 easy ways how you can bisect an angle for a perfect miter or scribe joint
How to bisect odd architrave and other angles during first and second fix carpentry work
To bisect an angle is to cut or divide it into two equal angles.
There are several ways to go about equally dividing an angle up, I'll explain on this page how I do it with a bevel, or a compass, or on the wall and show you a tool I've bought to speed the process up when working on site.
Quite often during framing and finish carpentry work I encounter an area where an angle needs to be divided into two.
Some common examples include when installing architrave to angled doors (under stairs etc), fitting fascias and soffits, scribing skirting boards (in bay windows etc.) and when applying quadrant or other decorative moldings to stair strings for example.
You don't need fancy tools to bisect an angle but bisecting angles can be a lot quicker and more accurate if you have something like the Trend angle fix tool for quick and easy divisions of angles as you can straight away transfer the angle you need on to the chop-saw or mitre saw.
It's quick as all you do is push it up to the two edges to bisect and it automatically finds half. Then you can walk straight over to the saw and start setting out/cutting the work piece.
The old fashioned way, is to use a bevel.
Method 1: How to bisect an angle with a bevel
Essentially what you do in this instance is create a birds eye view of the situation so you can set your bevel to the newly divided angle.
If you already have a good quality Bevel you can use that to bisect an angle instead of buying a purpose made tool:
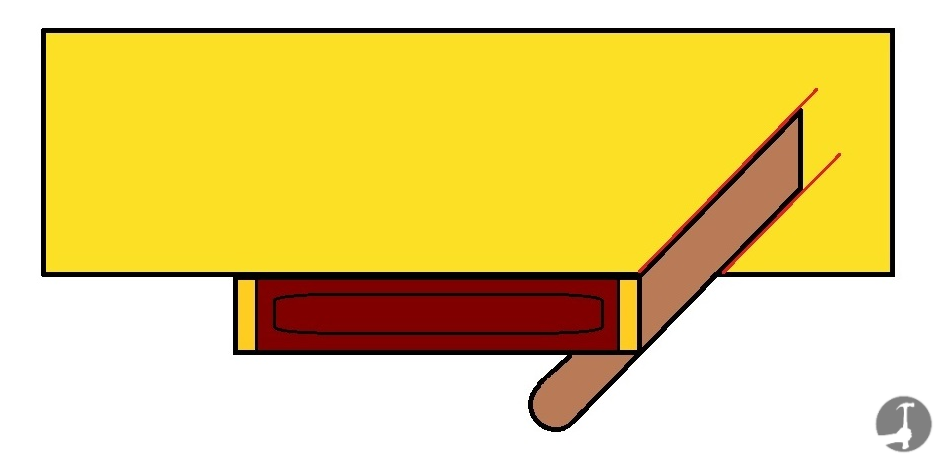
- Step 1: Use a bevel to set & mark out your angle to bisect
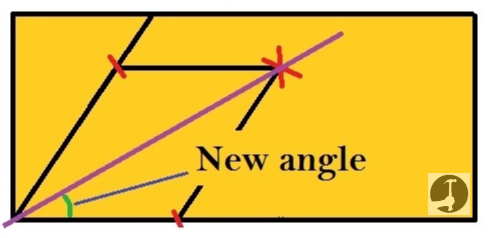
To bisect an angel with a bevel, the first thing to do is set a bevel to the angle you want to bisect, then grab a scrap piece of timber with a perfect straight edge to it. Butt the handle of the bevel up to the bottom edge, and mark a pencil line on both sides of the bevels blade as shown below.
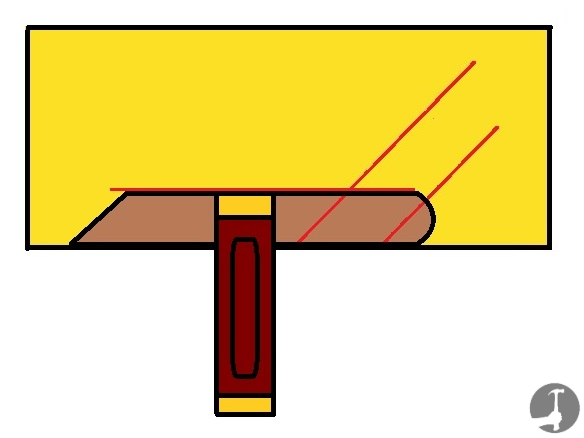
- Step 2: Mark the opposing direction in the same way
Next, move the blade of the bevel to mark the blades width up from the bottom edge of the timber, intersecting the lines already marked. Notice how my drawings are perfectly to scale.... not! Hopefully you can get the gist.
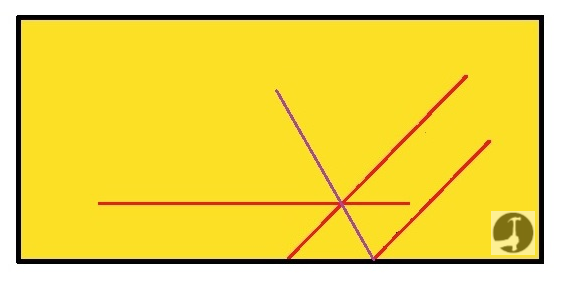
- Step 3: Connect the dots and set the bevel up to the new angle
Finally, draw a line from point to point like the purple one in the picture, and butt the bevel back up to the timber in it's original position and turn the blade to that new line.
Method 2: How to bisect an angle with a compass
- Step 1: Use a bevel to mark the angle to be bisected onto a scrap piece of timber
To bisect an angle with a compass, the first thing I do is again grab a scrap piece of timber & mark the angle onto it from the bottom edge.
Next, take a compass and put the point in the bottom left hand corner where the angle starts or the two lines meet.
Set the compass to mark two lines like the red ones in the pic below, as long as they are an identical distance from the corner it doesn't matter what the measurement is. 90-150mm is usually fine.

- Step 2: Set your compass and mark two points
Next, put the point of the same compass on to each point marked previously and mark two more lines further away, long enough to intersect each other.
Use the compass to mark an 'X' opposite the angle being bisected.
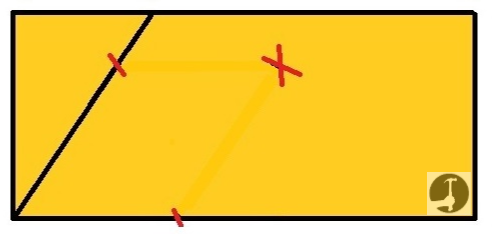
- Step 3: Mark a third point with the compass from each of the first two
Finally, draw a line from point to point again and re-set the bevel to the new bisected angle.
3. Bisecting an angle in-situ, like on a stair stringer or angled door for example
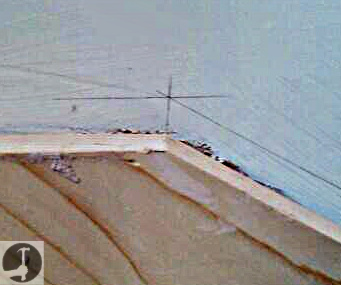
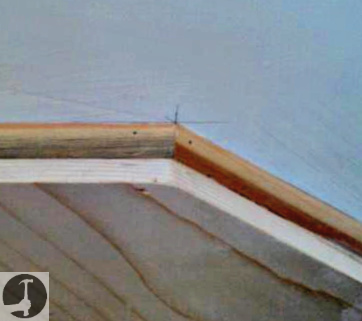
Sometimes, like in the picture below you can bisect an angle by putting each piece of the molding in place and marking a pencil line along the top. Then simply draw a line from point to point, where they intersect. Replace the molding and transfer the lines, then cut each on a mitre saw (I use a coping saw for tiny moldings like the one below).
You'll then need to check and adjust the cuts if necessary before fixing. For this reason, cut these bisected angle first whenever possible and once they fit cut the other end of the timber.
 |
 |
Bisect architrave angles in-situ in the same way
The same can be done to bisect an angle with architraves. This is another area where the angle finder comes in handy. If you don't have one yet you can follow these simple steps instead
- Step 1: Mark the margin
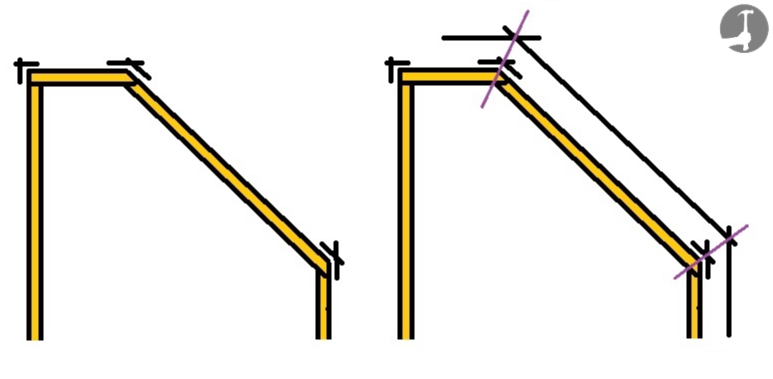
Set a combination square to the size you want the margin to be at and mark this round the lining, especially where the two moldings will intersect (below left)
- Step 2: Mark the position of the architraves onto the wall
The idea now is to put pieces of the architraves in place up to the margin one by one and draw around them, marking the wall where they intersect each other. Do this with each piece letting them sail past enough for the other angles to be cut later. Because I know the square corners will be 45 degree cuts, I leave them till last after I've fitted the more difficult bisected angles perfectly first.
Next, draw a line at each miter from point to point, from where the inside edges intersect to where the outside edges intersect (above right).
- Step 3: Joint the marks, offer the moldings up and cut
With an architrave like the one below, I'd start on the right hand side and again leave the right angle till last. Put the right hand architrave in place and mark it at both points where the margins intersect. Next, set up a bevel to the angle now marked on the wall. Set the miter saw to the angle and cut the architrave, keeping the saw blade to the side of the marks that isn't needed (waste side). Do the same for the next piece and then glue/nail the first one in place. Check the second piece fits tight to the first, adjust to suit and when happy mark the margin on the opposite end. Repeat the process fitting each end perfectly at a time before moving onto the next. Finally, you don't need to bisect an angle at the end but finish with a straight forward 45 cut.
What comes next?
Once you have bisected these angles, you can move on and install the skirting boards
Or click here to go back to the main architrave page
Have a question or comment about how to bisect an angle?