Fitting a Loft Trap for easy roof & attic access
Do you need to install a loft trap or hatch in your ceiling? This is a fairly easy DIY project to get right! A well designed and installed ceiling hatch will be easy to open and close securely. It will also be draft proof and not compromise the strength of the ceiling or roof structure above.
This job does potentially require cutting ceiling joists and/or roof trusses in order to create an large enough aperture for the new trap. It is best to think of in this way, every piece of timber in the way of your new loft trap has a purpose and was put there for a reason!
That reason may just be to hold up the ceiling that is screwed to it - a fairly light duty task. Or these timbers could be bracing the roof rafters to stop them from spreading (and the ridge dropping). Be careful and if you are unsure seek help from a professional before you get hacking away at your roof.
Essentially, what I am saying is if anything goes wrong and your wife leaves you because your roof caved in, I tried to bloody warn you!
How to design your loft hatch

You can either use a pre-made loft trap and simply create the hole specified in the instructions to install it in (keep scrolling down for this method). Otherwise above are two different designs I use to form a custom or bespoke loft trap for easy access into the attic space above.
The first method is really simple and easy to do. Simply create the frame by 'trimming' the ceiling joists and then line it with smooth, planed timber. Then to make the actual hatch itself either cut 25mm MDF to size or cut a cheap, ply flush door down, fill the cut end with timber and then rest it on top of the lining. This is only held in place by gravity so to open or remove just lift it off and slide into the roof space.
The second one takes a bit more skill, as you are essentially hanging a more solid door into the lining that swings down when opened. This one is better if you are installing a ladder but you need to make sure the frame you create is perfectly square for the door.
Each one is finished off with an architrave frame to cover the join between the ceiling and the lining timber that would otherwise crack if just decorated. This can be a small flat timber or decorative moulding to match others in the property.
If you are hinging a hatch door I would either use a touch latch or a barrel bolt to hold the door closed.
Whilst it might not look so good, I personally prefer using something like a barrel bolt. Using a touch latch is much neater as you won't see it from below but you need to leave a gap between the door and door stops to push the trap up into before it releases from the catch. This gap can mean a draft can sneak through, or allow hot air to escape up reducing the efficiency of your home.
Best location for the loft trap?
There is no exact science for choosing the best spot as there are so many variables but bear these points in mind before you start cutting holes in your ceiling!
- pick somewhere central to the roof space above so that when you go up into the roof you can easily access each area.
- Stay away from the corners of the building or roof where access is tight as there will be very little headroom there
- Hidden in a hallway or lesser used room where it won't create an eyesore could be best, if possible trim the joists so that the trap will be central/symmetrical when looked at from below
- Avoid trimming too close to walls or in too tight a space as it may be difficult to manoeuvre long objects into the loft
- Avoid trimming the opening where there are pipes or cables that you can't relocate as these will be in the way and likely to get damaged by any traffic in or out
- Even the best most draft proof loft trap could still let some cold air through in winter so avoid bedrooms too
- Avoid being too close to the top of a staircase or landing that could increase the distance someone might fall or drop something if ever there were an accident..
If you mark the position out from below and need to transfer these locations to the space above, bang a nail up through the ceiling in each corner that you can easily find from the attic.
Don't forget to allow for the thickness of the frame and lining materials when setting out the hole to cut in the ceiling.
Marking out the loft trap
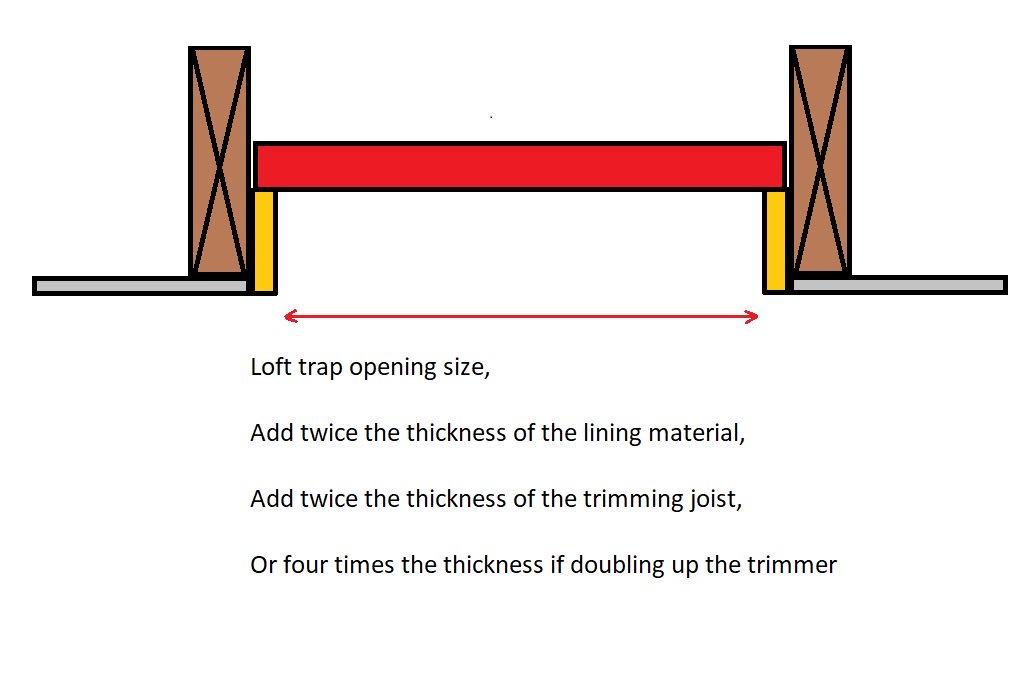
The picture above explains how to work out your dimensions depending on the sizes of your other materials being used.
For cutting the ceiling, the opening size plus twice the thickness of the lining material that will be fitted.
The add twice or four times the thickness of the trimmer depending on whether or not you are doubling up the trimmer joists.
Cut the ceiling out before cutting any joists!
Assuming you are 'retro-fitting' the loft trap and the finished ceiling is already in the way, I would cut and remove the section of ceiling first once I have marked out my aperture without cutting any joists. This will let more light up into the roof space so I can work more easily.
Use a jab-saw to start the hole off then finish with an old handsaw if you have one. Plasterboard will ruin the teeth on a good handsaw so don't use a new one..
Trimming the ceiling joists
Cutting and supporting joists or roof rafters is called 'trimming'. You'll need to use timber that is the same size and strength as the joists you are trimming and for the lining material afterwards, 90mm x 18-25mm smooth planed timber is generally fine and inexpensive enough.
When bracing timbers like this above a pre-finished ceiling (retro-fitting a loft trap), I tend to use screws rather than banging nails in that need to be removed later as this reduces the risk of cracking the ceiling or disrupting it too much. You'll most likely need to redecorate anyway, but the less patching up or repair work the better.
If cutting one joist out, a single trimmer can be strong enough. If cutting more than one joist then you need to double up the trimmer so it is strong enough to carry the weight of two or more.

Keeping it a few inches back from the line to be cut, fix some scrap timber across the joists to hold and support the one that is going to be cut out and removed.
Cut the joist out that is in the way using a hand or circular saw, and fix two pieces of timber across. Nail them to the outer joists and to the trimmed joist to stop it dropping down now the middle section is cut out.
If necessary, more trimmers in the opposite direction can be used to position or resize the loft trap.
Lining the loft trap
Unless you are installing a replacement loft trap or one in an existing property (rather than a new build) It's likely that a frame will be installed before the plasterboard and then after the flushing or plastering has been done the trap door, stops, catch and architraves will be fitted.
It's a bit like installing a normal door frame. You might find it easier to build the frame on the floor and then slide it up into the trimmed area, otherwise you can install 'in-situ'.
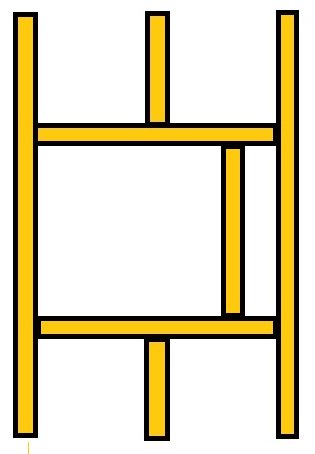
For strength the frame can be housed out like the picture below, this is more important if you are hinging a door not so much if the trap will simply sit down on top of the frame.
|
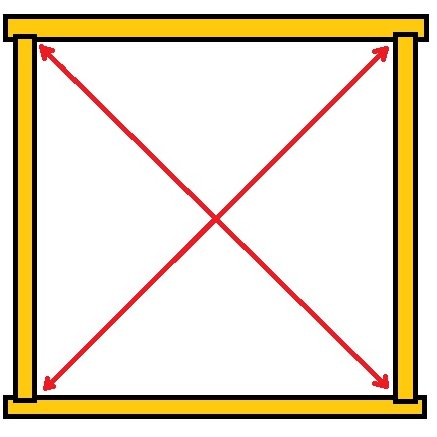
It will need to be perfectly square so the door works and the architraves are easy to install which means cutting opposing sections to equal lengths. Once glued and screwed together check the frame is square by using a framing square or measuring from corner to corner. |
 |
Once squared, if possible a door can be cut to fit the trap and hung. It will be easier to do it now before the frame is above your head. If you don't have the door yet but can chop the hinges in that will at least help. The door should be set out and hung the same as if hanging a normal internal door, but the hinges should only be about 50mm in from each end.
If you are using a touch latch the door stops will need to be fixed with a gap before the door so the door can be pushed up for the latch to engage.
Fixing the loft trap
To fix the trap, remove the door if you've hung it already and pre-drill some clearance holes into the frame. Ideally they'll be in a position where the door stops will cover them later on. Screw the frame in position remembering to let it protrude below the joists the thickness of the plasterboard and plaster that will be going on.
Architraves
The architraves should be fitted exactly as if installing them on a normal door, click here for help installing the architraves.
