Framing a gable roof
Building a gable with barge end, purlin struts and collar ties

The picture above shows the plan view of a gable roof. Ladder trusses are made up using four noggins (bridging) at each corner to support a rafter outside the building. That rafter outside forms the overhang for the barge boards to fix to, and so the soffit boards and ventilation are continuous all the way around the structure.
Roof members
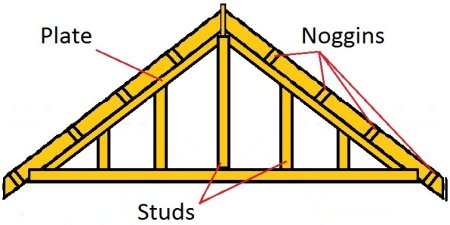
Framing a gable involves more than joists, common rafters and a ridge as covered in previous pages. Below is a picture of some extra roof members that go into the construction;

The extra timbers in a gable roof are;
Gable roof step by step
Step 1: Wall plates and Joists
Set out the wall plates to whatever centers you need for your gable roof (400, 450, 600 or 900 governed by the weight of roof covering ie tiles) and cut/fix the joists so they are parallel to each other and flush with the back edge of the wall plates.
Step 2: Ridge
Work out how wide you want the barge soffit boards. Measure the total length of the building and add the overhang/soffit size to it twice, once for each gable end. Cut a straight piece of ridge material to this length and place it on the wall plates, with an equal overhang at each end. Transfer all the positions of the rafters onto the ridge so it's quicker and easier to nail the rafters up later.
Step 3: Common rafters
A gable roof uses only common rafters. Measure the span and use it to calculate the rafter lengths including the overhang. Cut a pair and check they fit, before cutting the rest (add up all the markings on the wall plate to get to how many). Cut four extra rafters to length, without the birds-mouth this time to use for the ladder trusses (barges) on the outside.
Step 4: Get the rafters up
The rafters I put up first for a gable roof are the third pair in from the ends. I leave the two that will form the ladder truss till last. Nail two pairs to the wall plates and leave the tops loose, resting against each other for support. You should be able to push the ridge board up in between the rafters and they will pinch it and hold it in place. Doesn't hurt to cut a prop to support the ridge while you work at this stage or get someone to help. Nail the rafters to the ridge. Fill all the other rafters in as well apart from the ends, propping it up as you go.
Step 5: Ladder trusses
There are a couple of ways to do this. You can just nail the last rafters to the wall plate, then cut and fix noggins on at 400 centers. I prefer to put the noggins down and lay a rafter on top, space them out then nail with a nailgun. Turn it over and lay the rafter without a birds-mouth against it back to back then transfer the noggin positions onto it before nailing that to the noggins to form a ladder truss. This is then fairly easy to lift and nail on in one go and I find it much quicker and safer than messing around on the roof with noggins etc. The picture below show how the noggins are arranged as if the rafter without the birds-mouth hasn't been nailed on yet.
Step 6: Stud up the gable end
Unless the gable end is brickwork you'll need to build a bit of studwork to fill the end of the gable, and later clad it with something like plywood or tongue and groove boards. Firstly, put a vertical timber straight up under the ridge to support that. Then put two plates diagonally from the wall plate to the one just placed under the ridge, they'll also help to hold up the noggins that form the ladder truss. Finally stud up the remaining void at 400 centers to fill in the gaps.
Step 7: Collar ties
Collar ties need a seat cut on each end and they need to be fixed level in order to get the benefit. The amount you'll need should be specified on a technical drawing If the rafters are at 900 centers I'd put a collar on every one, if they're 400 you can sometimes get away with every other. Keep the seat cut about 10mm back from the outer edge of the rafter. Sometimes it's easier to put one each end and one in the middle, then pull a string line through to make putting the rest up quicker.
Step 8: Purlins and struts
The gable roof will need to be strutted and supported to take the weight of the roof covering.
Click here for fascia and soffit tips
